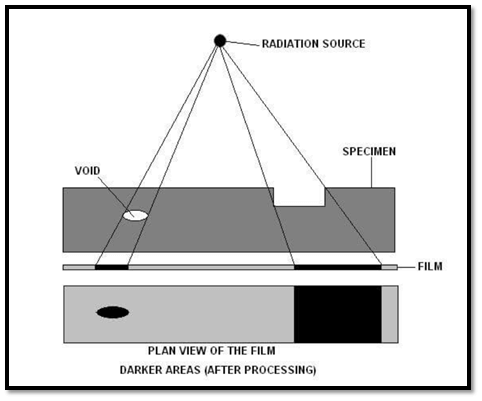
Radiography is a volumetric NDT test method used to determine internal flaws in castings and Welds. Radiographic testing includes passing of X-rays or Gamma Rays through the test item from one side and recording the rays on an imaging media on the other side giving a permanent visual record of the internal structure of the test items.
X-rays were initially developed for medical applications. To learn more about the history of radiography testing read our blog HISTORY OF NON-DESTRUCTIVE TESTING.
THE BASIC PRINCIPLE OF RADIOGRAPHY TESTING :
Radiography testing Uses the ability of x-rays and gamma rays to penetrate materials. X-rays and gamma rays can even penetrate materials that don’t transmit light. Penetration depends upon thickness, the density of material and size of source being used.
In passing through the material some of these rays get absorbed and transmitting the rest of the rays. These transmitted rays are recorded on an imaging media which on further processing gives a radiographic image of the test object.
We have posted a detailed article about digital radiography in our Blog :
INTRODUCTION TO RADIOGRAPHIC TESTING(RT).
One often comes to words NDT Method and NDT Techniques and uses them interchangeably; however it is not like that.
What is an NDT Method:
A method is one of the disciplines of NDT.
For example, ultrasonic testing within which various test techniques may exist.
What is an NDT Test Technique:
a test technique is a category within an NDT method;
for example, immersion ultrasonic testing.
Film-based conventional radiography is still prominent in the manufacturing industry, but there are times and applications when required results are cannot be obtained from conventional film-based radiography. Hence many times advanced radiography techniques are used. Here in this we article we will learn about different techniques of radiography.
Stereo Radiography
One of the limitations of conventional film based radiography is that it doesn’t provide the depth of the discontinuity. This can be overcome using a radiography technique called stereo Radiography.
Stereo radiography is a radiographic method using two separate radiographs made with a source shift exactly parallel to the film plane, as in Figure 10.5.
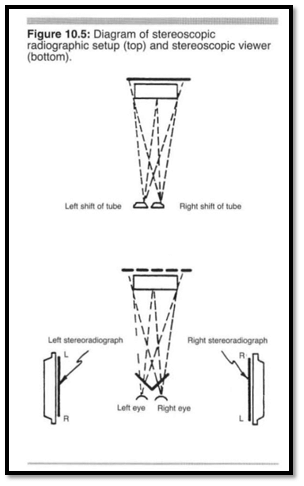
Ref: ASNT Level III Guide Radiography Testing
This technique is infrequently used in industrial radiography, but on occasion, it can be used to localize and characterize indications or to visualize the spatial arrangement of hidden structure or the relative positions of the various parts of the object along the direction of vision.
Stereo radiographic techniques can be used to create depth perception similar to that of natural vision. Objects viewed with a normal pair of eyes appear in their true perspective and in their correct spatial relation to each other, largely because of the natural stereoscopic vision of the human eyes (depth perception). Each eye receives a slightly different view and the two images are combined by the brain to give the impression of three dimensions as shown in the image below.
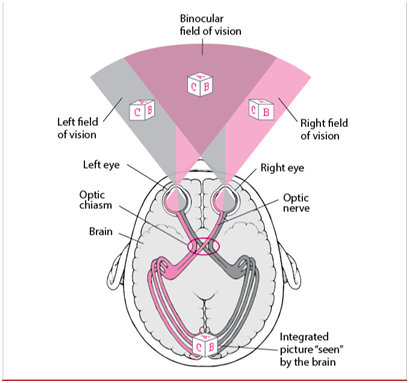
PC: https://www.merckmanuals.com/home/eye-disorders/biology-of-the-eyes/structure-and-function-of-the-eyes
To duplicate this stereoscopic vision in radiography requires two radiographs made from two positions of the X-ray tube separated by the normal human interpupillary distance. After processing, the two radiographs are viewed in a stereoscope, a device that by an arrangement of prisms or mirrors permits each eye to see only one of the stereo radiographs. As in normal vision, the brain integrates the two images into one in which the various features stand out in relief in true perspective and in correct spatial relation. It is important to remember that the radiograph exposed in the right shift position of the tube is viewed by the right eye and the one exposed by the left shift position is viewed by the left eye.
In fact, the conditions of viewing the radiographs should be analogous to the conditions under which they were exposed. The two Eyes take the place of the two positions of the focal spot of the X-ray tube, and the radiograph as viewed in mirrors or prisms occupies the same position with respect to the eyes as did the films
With respect to the tube during the exposures. The eyes sec the X-ray representation of the part just as the X-ray tube exposed the actual part.
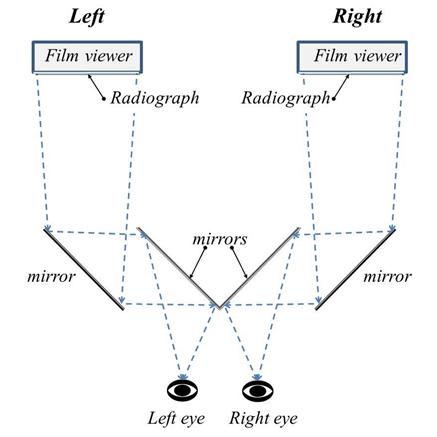
PC https://www.researchgate.net/figure/Diagram-of-a-stereoscope_fig1_276493377
Flash Radiography
Flash radiography is a special type of radiography that is used to produce a single stop motion image or a series of sequential images of high-speed phenomena. Exposure times of one-millionth of a second or less can be achieved through the use of specially designed high voltage generating equipment and X-ray tubes. Such exposure times are significantly short to provide stop motion radiographs of projectiles, high-speed machinery and other objects.
The general principles that govern the production and the imaging characteristics of X-rays are identical for conventional static radiography and flash radiography. In conventional X-ray tubes, a thermionic cathode is used to produce an electron beam that is accelerated and focused to strike a small spot on a metal plane target. This basic mechanism is also used in flash radiography. However, because thermionic cathodes are not capable of producing the very high peak current densities and total currents required for flash radiography, different electron sources must be used. These sources do not allow effective focusing of the electron beam, so special X-ray tube and target geometries must be designed to achieve the necessary confined focal spot.
Flash X-ray radiography (FXR) has become an important diagnostic technique in the field of terminal ballistics and detonation research. In terminal ballistics, real-time imaging of the penetration events of the projectile in the target is very essential to analyze the ballistic efficiency of the target materials
The FXR system has also been used to study the jet pattern of Argon gas released from a nozzle at 1 bar pressure. The study involves using an FXR system in the voltage range of 10–35 kV.
FXR can be effectively used over the above optical techniques due to its advantages such as penetration ability through dust clouds and target materials. The penetration ability of X-rays depends on the energy of the X-ray beam and density of the target material.
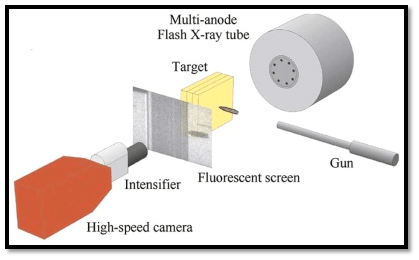
PC: https://www.sciencedirect.com/science/article/pii/S2214914716000271#f0010
In Motion Radiography
The techniques used for in motion radiography are the same as for conventional static radiographic techniques except for the exposure time. The exposure time is converted to speed of travel and is recorded as some distance Per minute. Two methods are available for density control: decrease density by increasing speed or increase density by decreasing speed.
These are affected by:
- type of material being radiographed,
- thickness of material,
- film speed,
- use of intensifying screens, and
- source-to-film distance.
in motion radiography permits testing of almost unlimited part sizes with slightly modified conventional equipment, can be used in production shops without radiation hazard because of equipment used, and permits images to be recorded on a continuous sheet of film.
An exposure is made with one of the following techniques.
1. A part is moved through a collimated beam of radiation emitted by a stationary source.
2. A collimated source is moved relative to a stationary part.
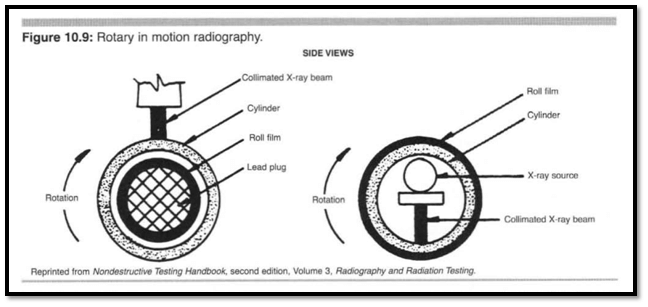
Ref: ASNT Level III Guide Radiography Testing
Electron Radiography
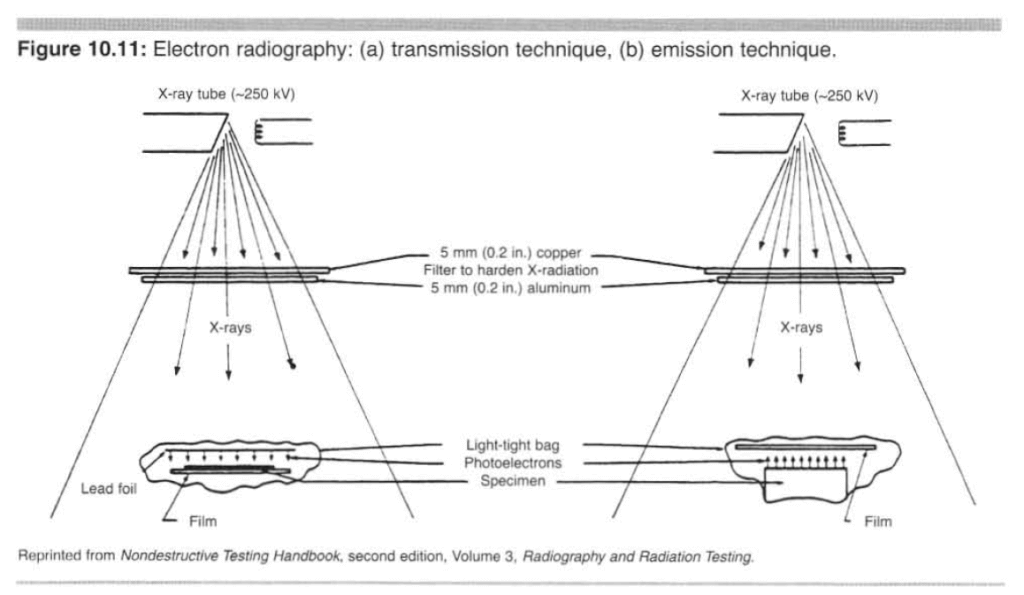
This technique uses high energy secondary photoelectrons instead of X-rays for recording a specimen image on film. There exist two distinct types of electron radiography, transmission and emission.
Electron transmission radiography has been used to evaluate paper-thin, low atomic number specimens when X-ray photons of about 250 kV produce secondary photoelectrons. These electrons are normally from lead foil and are used to register a latent image on a film.
Electron emission radiography (specimen electron emission) uses X-ray photons to produce secondary photoelectrons at the surface of a suitable specimen, enabling a material related surface image to be formed on the film. The radiographic setup for both of the electron radiographic techniques is shown in Figure 10.11. Note that in the transmission technique, the photoelectrons arc produced from the lead foil above and adjacent to the specimen. However, in the emission technique, the specimen itself is the source of the photoelectrons.
Ref: ASNT Level III Guide Radiography Testing
Computed Tomography
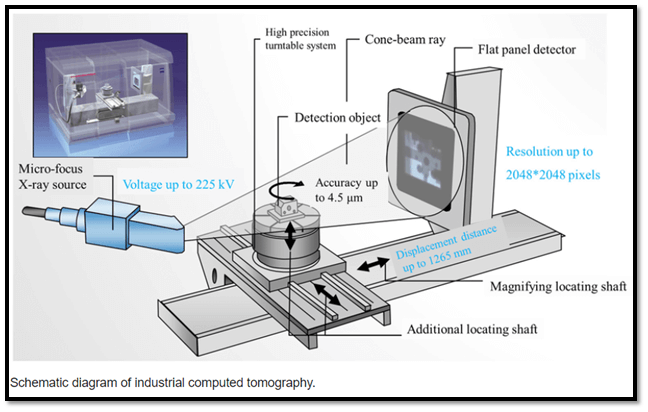
Computed Tomography uses X-ray transmission information from numerous angles about an object to digitally reconstruct cross sectional images of the interior structure. To generate a computed tomography image, X-ray
Transmission is measured by an array of detectors; Data are obtained by translating and/or rotating the object so that many viewing angles around the object are used.
PC: https://www.researchgate.net/figure/Schematic-diagram-of-industrial-computed-tomography_fig1_337619553
The X-ray beam is collimated to a narrow slit and aligned with a solid state X-ray detector array to define a computed tomography slice plane in the object. The slit collimation reduces scatter, improving the signal-to-noise ratio in the image. Data are obtained by translating and rotating the object so that many viewing angles around the object are acquired. When a series of projections is taken from many angles, the projection data can be back projected to create an image. As the number of projections increases, the ability to more exactly reconstructs the object increases. A computer mathematically reconstructs the cross sectional image from the multiple view data collected.
By Jgarant – Own work, CC BY-SA 4.0, https://commons.wikimedia.org/w/index.php?curid=42127619
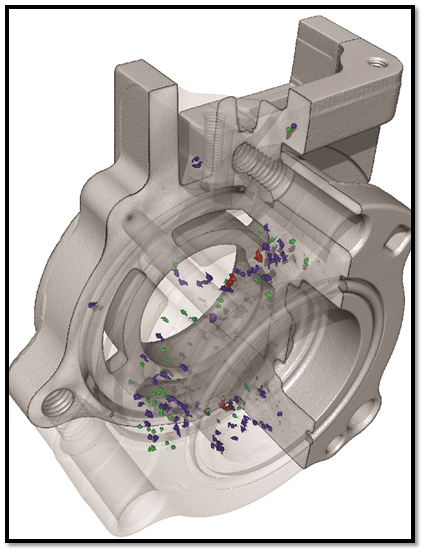
An industrial computed tomography (CT) scan conducted on an aluminum casting to identify internal failures such as voids. All color coordinated particles within casting are voids/porosity/air pockets, which can additionally be measured and are color coordinated according to size.
A primary benefit of computed tomography is that features are not superimposed in the image, thus making it easier to interpret than radiographic projection images. The image data points are small volumetric measurements directly related to the X-ray attenuation coefficient of the material present in the volume elements defined by the slice thickness and the image plane resolution of the computed tomography system. The computed tomography image values and locations provide quantitative data for dimensional and material density /constituent measurements.
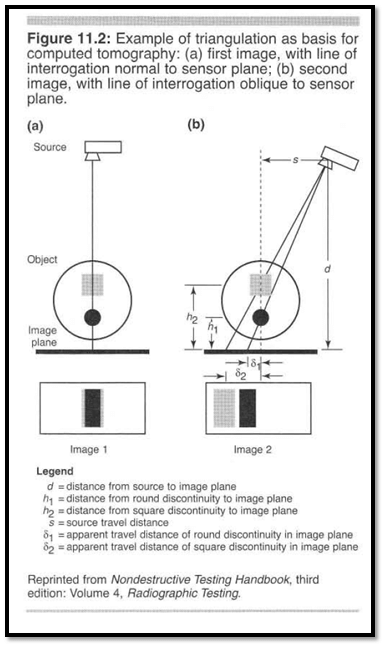
To determine the depth location of a feature found on a radiograph, a triangulation technique is used. This (as shown in Figure 11.2) consists of obtaining a second film of the area in question, but with the source in a different angular position relative to the test specimen than was obtained on the first exposure. The geometry is carefully laid out on paper; measured positions of source, test specimen, and discontinuities on the films are noted; and the position of the d is continuities along the intersecting lines-of-sight is determined. Triangulation is a rudimentary tomographic reconstruction that contains the essential.
Ref: ASNT Level III Guide Radiography Testing
Elements of computed tomography.
- The first step is to recognize the features of interest.
- The second step is to correlate the test specimen, the source position, and the radiographic image together for both exposures.
- The final and third step is to note the position of the attenuation corresponding to the feature and to project it back to the source along the original attenuation line. This back projection is performed for each exposure and the combined effects of these two back projections are the constructive interference of the two attenuation patterns.
Neutron radiography
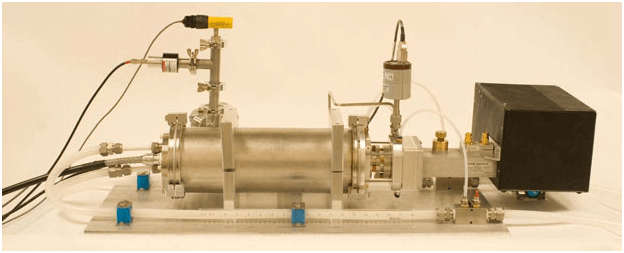
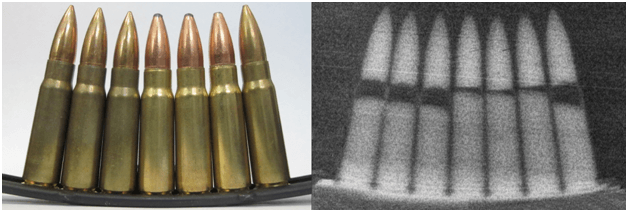
Neutron radiography is a nondestructive testing technique similar but complementary to conventional radiography. It is the process of making an image with neutrons. The resulting image is based on the neutron attenuation properties of the imaged object. The resulting images have much in common with industrial X-ray images, but since the image is based on neutron attenuating properties instead of X-ray attenuation properties, some things easily visible with neutron imaging may be very challenging or impossible to see with X-ray imaging techniques and vice versa.
Ref: https://www.adelphitech.com/awards.html
The ability to image low atomic number materials in the presence of a high atomic number matrix can be of considerable interest in a variety of industries. Rubber, plastic, or wood can be observed in specimens made of steel, aluminum or lead. The hydrogenous explosive charge can be seen inside a brass shell casing. Fluid levels can be seen inside high atomic number containers such as steel or lead. Corrosion and water entrapment can easily be seen inside metal structures such as honeycomb aircraft assemblies.
PC: http://www.starfireindustries.com/pictoris–neutron-radiography.html
Neutron Energies
it is usual to group neutrons into four categories:
- fast neutrons with energies exceeding 0.1 MeV,
- epithermal neutrons with energies in the range of 0.3 to 102 eV,
- thermal neutrons with energies in the range of 0.01 to 0.3 eV,
- cold neutrons with energies in the range of 0.0 to 0.01 eV.
Neutron Sources
Neutrons can be produced from various sources, including reactors, accelerators, and radioactive isotopes. Sources of neutrons for radiography are:
a) Atomic reactors
b) Particle accelerators
c) Radioisotopes (notably 252Californium).
Backscatter imaging
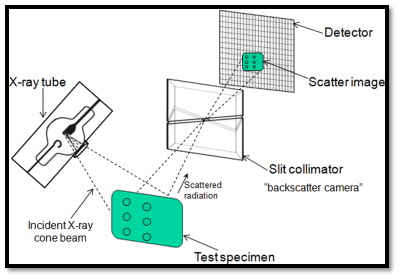
Backscatter X-ray is an advanced X-ray imaging technology. Traditional X-ray machines detect hard and soft materials by the variation in x-ray intensity transmitted through the target. In contrast, backscatter X-ray detects the radiation that reflects from the target. It has potential applications where the less-destructive examination is required, and can operate even if only one side of the target is available for examination. Backscatter technology is based on the Compton scattering effect of X-rays, a form of ionizing radiation. Unlike a traditional X-ray machine, which relies on the transmission of X-rays through the object, a backscatter X-ray detects the radiation that reflects from the object and forms an image.
Ref: ScienceDirect.com
The backscatter pattern is dependent on the material property and is good for imaging organic material.
The unique nature of backscatter Imaging has made it particularly useful in several areas. The backscatter technique images from one side, making it useful in applications such as aircraft pressure bulkheads and other structures with access to both sides of the object Impractical or not possible.
Some backscatter X-ray scanners can scan much larger objects, such as trucks and containers. This scan is much faster than a physical search and could potentially allow a larger percentage of shipping to be checked for smuggled items, weapons, drugs, or people.
References:
- ASNT Level III Study Guide Radiography Testing
- sciencedirect.com
- Wikipedia.org
- sciencedirect.com
