1.0 SCOPE
This Procedure specifies the minimum requirements for the Eddy Current Testing (ECT) of Non Ferromagnetic Cooler tubing. This procedure is suitable for tube material ASTM B111 C71640, having tube OD 25.4mm and wall thickness 2.41mm.
2.0 REFERENCE DOCUMENTS:
| 2.1 | ASME Section V 2021 Edition | Non Destructive Examination |
| 2.2 | ASNT SNT TC –1A 2020 Edition | Guidelines for Personnel Qualification & Certification |
3.0 PERSONNEL QUALIFICATION:
The interpretation and recording of the test results shall be carried out by the NDT Level II as per written procedure. The Technician shall be used as an assistant to the NDT Level II.
4.0 PROCEDURE QUALIFICATION:
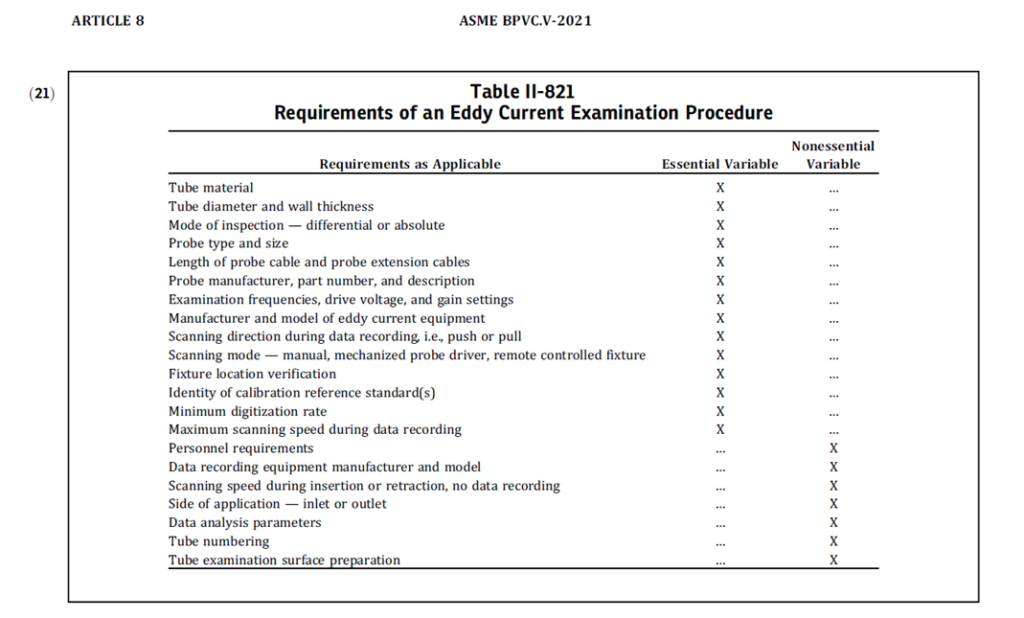
4.1 Requirements. Eddy current examinations shall be conducted in accordance with a written procedure which shall contain, as a minimum, the requirements listed in Table II-821. The written procedure shall establish a single value, or range of values, for each requirement.
4.2 Procedure Qualification. a change of a requirement in Table II-821 identified as an essential variable shall require requalification of the written procedure by demonstration.
A change of a requirement identified as a nonessential variable does not require requalification of the written procedure. All changes of essential or nonessential variables from those specified within the written procedure shall require revision of, or an addendum to, the written procedure.
Procedure qualification test shall be performed to the satisfaction of the company before starting of the work. All qualification tests shall be witnessed by company authorized personal.
5.0 SAFETY:
All Personnel shall have responsibility to themselves and other persons with regard to safety and shall ensure that site facilities are adequate with regard to lighting, scaffolding and the like, prior to commencement of Operations.
To learn about basics of eddy current testing read our blog :
6.0 EQUIPMENT:
6.1 Multifrequency-Multiparameter Equipment.
The eddy current instrument shall have the capability of generating multiple frequencies simultaneously or multiplexed and be capable of multiparameter signal combination. In the selection of frequencies, consideration shall be given to optimizing flaw detection and characterization.
- (a) The outputs from the eddy current instrument shall provide phase and amplitude information.
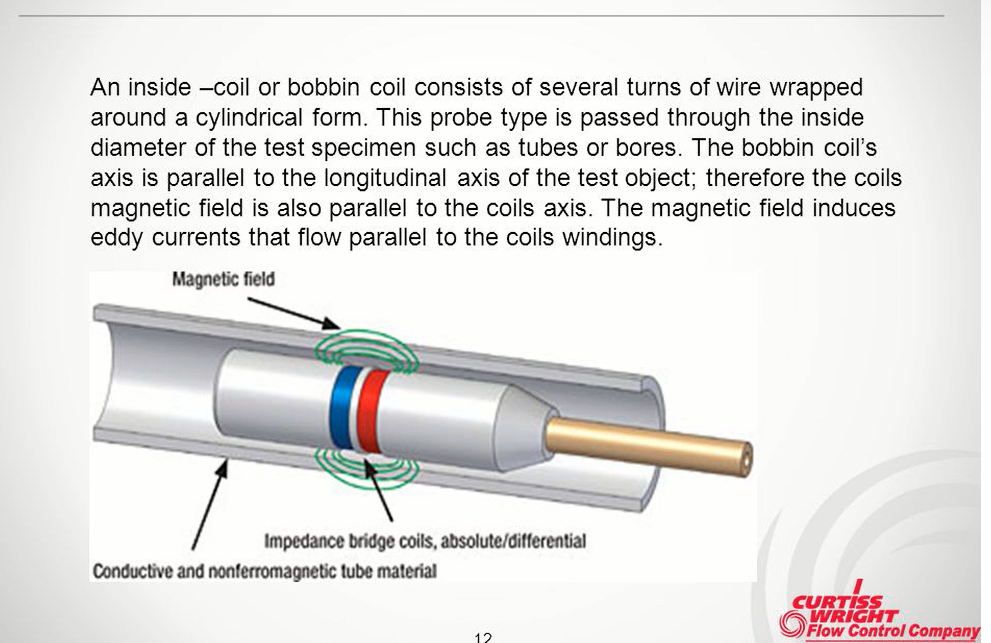
- (b) The eddy current instrument shall be capable of operating with bobbin coil probes in the differential mode or the absolute mode, or both.
- (c) The eddy current system shall be capable of real time recording and playing back of examination data.
- (d) The eddy current equipment shall be capable of detecting and recording dimensional changes, metallurgical changes and foreign material deposits, and responses from imperfections originating on either tube wall surface.
6.2 ANALOG DATA ACQUISITION SYSTEM
6.2.1 Analog Eddy Current Instrument.
- (a) The frequency response of the outputs from the eddy current instrument shall be constant within 2% of full scale from dc to Fmax, where Fmax (Hz) is equal to 10 Hz-sec/in. (0.4 Hz-s/mm) times maximum probe travel speed in./sec (mm/s).
- (b) Eddy current signals shall be displayed as two dimensional patterns by use of an X-Y storage oscilloscope or equivalent.
- (c) The frequency response of the instrument output shall be constant within 2% of the input value from dc to Fmax, where Fmax (Hz) is equal to 10 Hz-sec/in. (0.4 Hz-sec/mm) times maximum probe travel speed.
6.2.2 Magnetic Tape Recorder.
(a) The magnetic tape recorder used with the analog equipment shall be capable of recording and playing back eddy current signal data from all test frequencies and shall have voice logging capability.
(b) The frequency response of the magnetic tape recorder outputs shall be constant within 10% of the input value from dc to Fmax, where Fmax (Hz) is equal to 10 Hz-sec/in. (0.4 Hz-s/mm) times maximum probe travel speed. Signal reproducibility from input to output shall be within 5%.
6.2.3 Strip Chart Recorder.
- Strip chart recorders used with analog equipment shall have at least 2 channels.
- The frequency response of the strip chart recorder shall be constant within 20% of full scale from dc to Fmax, where Fmax (Hz) is equal to 10 Hz-sec/in. (0.4 Hz-s/mm) times maximum probe travel speed.
6.3 DIGITAL DATA ACQUISITION SYSTEM
6.3.1 Digital Eddy Current Instrument.
- (a) At the scanning speed to be used, the sampling rate of the instrument shall result in a minimum digitizing rate of 30 samples per in. (25 mm) of examined tubing, use dr = sr/ss, where dr is the digitizing rate in samples per in., sr is the sampling rate in samples per sec or Hz, and ss is the scanning speed in in. per sec.
- (b) The digital eddy current instrument shall have a minimum resolution of 12 bits per data point.
- (c) The frequency response of the outputs of analog portions of the eddy current instrument shall be constant within 2% of the input value from dc to Fmax, where Fmax (Hz) is equal to 10 Hz-s/in. (0.4 Hz-sec/mm) times maximum probe travel speed.
- (d) The display shall be selectable so that the examination frequency or mixed frequencies can be presented as a Lissajous pattern.
- (e) The Lissajous display shall have a minimum resolution of 7 bits full scale.
- (f) The strip chart display shall be capable of displaying at least 2 traces.
- (g) The strip chart display shall be selectable so either the X or Y component can be displayed.
- (h) The strip chart display shall have a minimum resolution of 6 bits full scale.
6.3.2 Digital Recording System.
- (a) The recording system shall be capable of recording and playing back all acquired eddy current signal data from all test frequencies.
- (b) The recording system shall be capable of recording and playing back text information.
- (c) The recording system shall have a minimum resolution of 12 bits per data point.
7.0 PROBES :
7.1 General Requirements.
- Bobbin coils shall be able to detect artificial discontinuities in the calibration reference standard.
- Bobbin coils shall have sufficient bandwidth for operating frequencies selected for flaw detection and sizing.
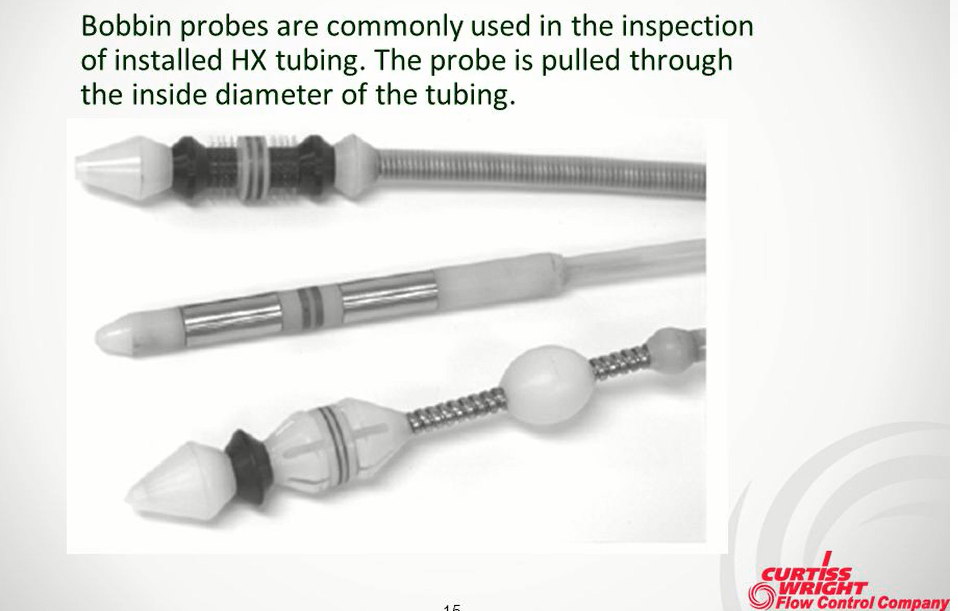
- Probes used shall be dual coil internal bobbin type and shall be capable of simultaneous differential and absolute operation.
- Bobbin Coils shall be able to detect calibration standard discontinuities
- Bobbin Coils shall have sufficient bandwidth for operating frequencies selected for flaw detection and sizing
8.0 DATA ANALYSIS SYSTEM :
8.1 Basic System Requirements.
- (a)The data analysis system shall be capable of displaying eddy current signal data from all test frequencies.
- (b) The system shall have multiparameter mixing capability.
- (c) The system shall be capable of maintaining the identification of each tube recorded.
- (d) The system shall be capable of measuring phase angles in increments of one degree or less.
- (e) The system shall be capable of measuring amplitudes to the nearest 0.1 volt.
8.2 ANALOG DATA ANALYSIS SYSTEM
8.2.1 Display. Eddy current signals shall be displayed as Lissajous patterns by use of an X-Y storage display oscilloscope or equivalent. The frequency response of the display device shall be constant within 2% of the input value from dc to Fmax, where Fmax (Hz) is equal to 10 Hz-sec/in. (0.4 Hz-s/mm) times maximum probe travel speed.
8.2.2 Recording System.
- The magnetic tape recorder shall be capable of playing back the recorded data.
- The frequency response of the magnetic tape recorder outputs shall be constant within 10% of the input value from dc to Fmax, where Fmax (Hz) is equal to 10 Hz-sec/in. (0.4 Hz-s/mm) times maximum probe travel speed in./sec (mm/s).
- Signal reproducibility input to output shall be within 5%.
8.3 DIGITAL DATA ANALYSIS SYSTEM
8.3.1 Display.
- (a) The analysis display shall be capable of presenting recorded eddy current signal data and test information.
- (b) The analysis system shall have a minimum resolution of 12 bits per data point.
- (c) The Lissajous pattern display shall have a minimum resolution of 7 bits full scale.
- (d) The strip chart display shall be selectable so either the X or Y component of any examination frequency or mixed frequencies can be displayed.
- (e) The strip chart display shall have a minimum resolution of 6 bits full scale.
8.3.2 Recording System.
(a) The recording system shall be capable of playing back all recorded eddy current signal data and test information. The recording system shall have a minimum resolution of 12 bits per data point.
8.4 HYBRID DATA ANALYSIS SYSTEM
- Individual elements of hybrid systems using both digital elements and some analog elements shall meet specific sections of II-830, as applicable.
- When analog to digital or digital to analog converters are used, the frequency response of the analog element outputs shall be constant within 5% of the input value from dc to Fmax, where Fmax (Hz) is equal to 10 Hz-sec/in. (0.4 Hz-s/mm) times maximum probe travel speed.
9.0 REQUIREMENTS :
9.1 RECORDING AND SENSITIVITY LEVEL
(a) The eddy current signal data from all test frequencies shall be recorded on the recording media as the probe traverses the tube.
(b)The sensitivity for the differential bobbin coil technique shall be sufficient to produce a response from the through-wall hole(s) with a minimum vertical amplitude of 50% of the full Lissajous display height.
9.2 PROBE TRAVERSE SPEED
The traverse speed shall not exceed that which provides adequate frequency response and sensitivity to the applicable calibration discontinuities. Minimum digitization rates must be maintained at all times.
10.0 CALIBRATION :
10.1 EQUIPMENT CALIBRATION
10.1.1 Analog Equipment. The following shall be verified by annual calibration:
- the oscillator output frequency to the drive coil shall be within 5% of its indicated frequency
- the vertical and horizontal linearity of the cathode ray tube (CRT) display shall be within 10% of the deflection of the input voltage
- the CRT vertical and horizontal trace alignment shall be within 2 deg of parallel to the graticule lines
- the ratio of the output voltage from the tape recorder shall be within 5% of the input voltage for each channel of the tape recorder
- the chart speed from the strip chart recorder shall be within 5% of the indicated value
- amplification for all channels of the eddy current instrument shall be within 5% of the mean value, at all sensitivity settings, at any single frequency
- the two output channels of the eddy current instrument shall be orthogonal within 3 deg at the examination frequency
10.1.2 Digital Equipment. Analog elements of digital equipment shall be calibrated in accordance with above mentioned Analog Equipment requirements and Digital elements need not be calibrated.
10.2 CALIBRATION REFERENCE STANDARDS
10.2.1 Calibration Reference Standard Requirements. Calibration reference standards shall conform to the following:
- (a) Calibration reference standards shall be manufactured from tube(s) of the same material specification and nominal size as that to be examined in the vessel.
- (b) Tubing calibration reference standard materials heat treated differently from the tubing to be examined may be used when signal responses from the discontinuities described in II-862.2 are demonstrated to the Inspector to be equivalent in both the calibration reference standard and tubing of the same heat treatment as the tubing to be examined.
- (c) As an alternative to (a) and (b), calibration reference standards fabricated from UNS Alloy N06600 shall be manufactured from a length of tubing of the same material specification and same nominal size as that to be examined in the vessel.
- (d) Artificial discontinuities in calibration reference standards shall be spaced axially so they can be differentiated from each other and from the ends of the tube. The as-built dimensions of the discontinuities and the applicable eddy current equipment response shall become part of the permanent record of the calibration reference standard. Each calibration reference standard shall be permanently identified with a serial number.
10.2.2 Calibration Reference Standards for Differential and Absolute Bobbin Coils.
- Calibration reference standards shall contain the following artificial discontinuities:
- One or four through-wall holes as follows:
- A 0.052 in. (1.3 mm) diameter hole for tubing 0.067 in. (1.70 mm) hole for tubing with diameters greater than 0.750 in. (19 mm).
- Four holes spaced 90 deg apart in a single plane around the tube circumference, 0.026 in. (0.65 mm) diameter for tubing with diameters of 0.750 in. (19 mm) and less and 0.033 in. (0.83 mm) diameter for tubing with diameters greater than 0.750 in. (19 mm).
- A flat-bottom hole 0.109 in. (2.7 mm) diameter, 60% through the tube wall from the outer surface.
- Four flat-bottom holes 0.187 in. (5 mm) diameter, spaced 90 deg apart in a single plane around the tube circumference, 20% through the tube wall from the outer surface.
- The depth of the artificial discontinuities, at their center, shall be within 20% of the specified depth or 0.003 in. (0.08 mm), whichever is less. All other dimensions shall be within 0.003 in. (0.08 mm).
- All artificial discontinuities shall be sufficiently separated to avoid interference between signals, except for the holes specified in (a)(1)(-b) and (a)(3).
10.3 ANALOG SYSTEM SETUP AND ADJUSTMENT
10.3.1 Differential Bobbin Coil Technique.
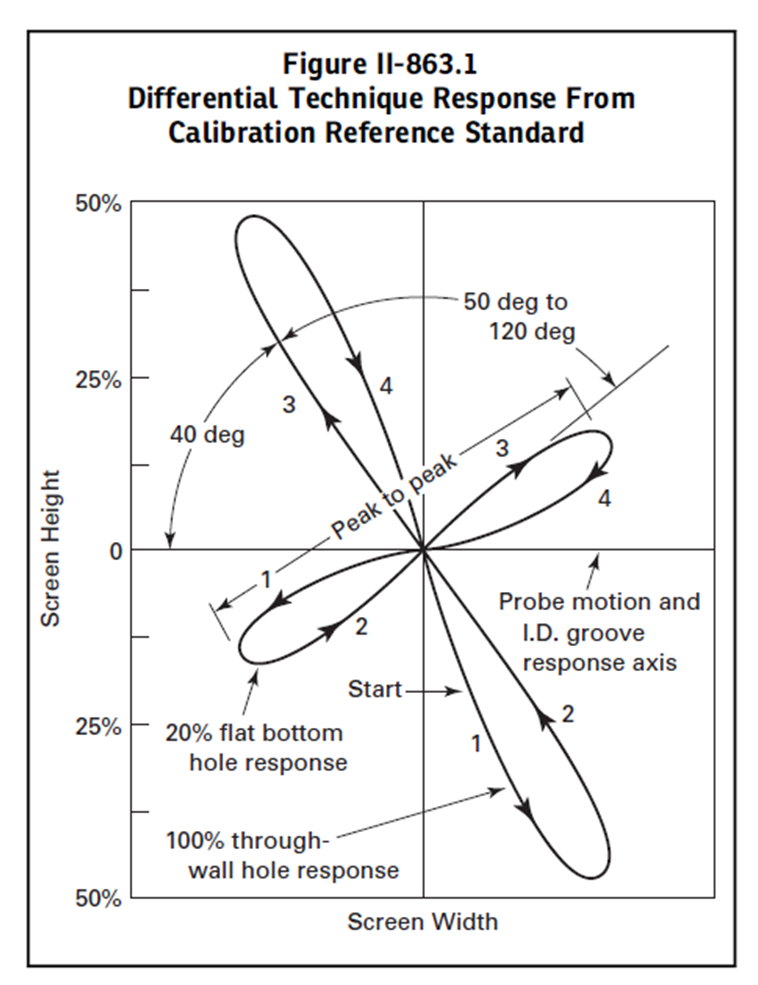
- The sensitivity shall be adjusted to produce a minimum peak-to-peak signal of 4 V from the four 20% flat bottom holes or 6 V from the four through-wall drilled holes.
- The phase or rotation control shall be adjusted so the signal response due to the through-wall hole forms down and to the right first as the probe is withdrawn from the calibration reference standard holding the signal response from the probe motion horizontal. See Figure II-863.1.
- Withdraw the probe through the calibration reference standard at the nominal examination speed. Record the responses of the applicable calibration reference standard discontinuities. The responses shall be clearly indicated by the instrument and shall be distinguishable from each other as well as from probe motion signals.
10.3.2 Absolute Bobbin Coil Technique.
- The sensitivity shall be adjusted to produce a minimum origin-to-peak signal of 2 V from the four 20% flat bottom holes or 3 V from the four through-wall drilled holes.
- Adjust the phase or rotation control so that the signal response due to the through-wall hole forms up and to the left as the probe is withdrawn from the calibration reference standard holding the signal response from the probe motion horizontal. See Figure II-863.2.
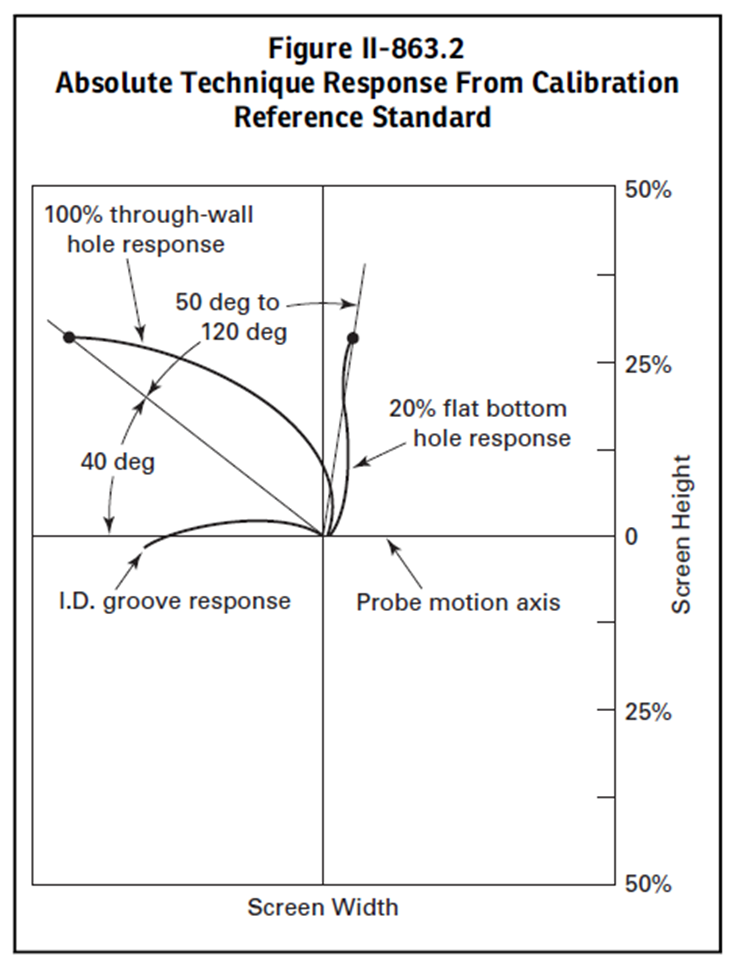
- Withdraw the probe through the calibration reference standard at the nominal examination speed. Record the responses of the applicable calibration reference standard discontinuities. The responses shall be clearly indicated by the instrument and shall be distinguishable from each other as well as from probe motion signals.
10.4 DIGITAL SYSTEM OFF-LINE CALIBRATION
The eddy current examination data is digitized and recorded during scanning for off-line analysis and interpretation. The system setup of phase and amplitude settings shall be performed off-line by the data analyst. Phase and amplitude settings shall be such that the personnel acquiring the data can clearly discern that the eddy current instrument is working properly.
10.5 System Calibration Verification.
- Calibration shall include the complete eddy current examination system. Any change of probe, extension cables, eddy current instrument, recording instruments, or any other parts of the eddy current examination system hardware shall require recalibration.
- System calibration verification shall be performed and recorded at the beginning and end of each unit of data storage of the recording media.
- Should the system be found to be out of calibration (as defined in II-863), the equipment shall be recalibrated. The recalibration shall be noted on the recording. All tubes examined since the last valid calibration shall be reexamined.
- EXAMINATION : Data shall be recorded as the probe traverses the tube.
11.0 DATA EVALUATION :
11.1 MEANS OF DETERMINING INDICATION DEPTH
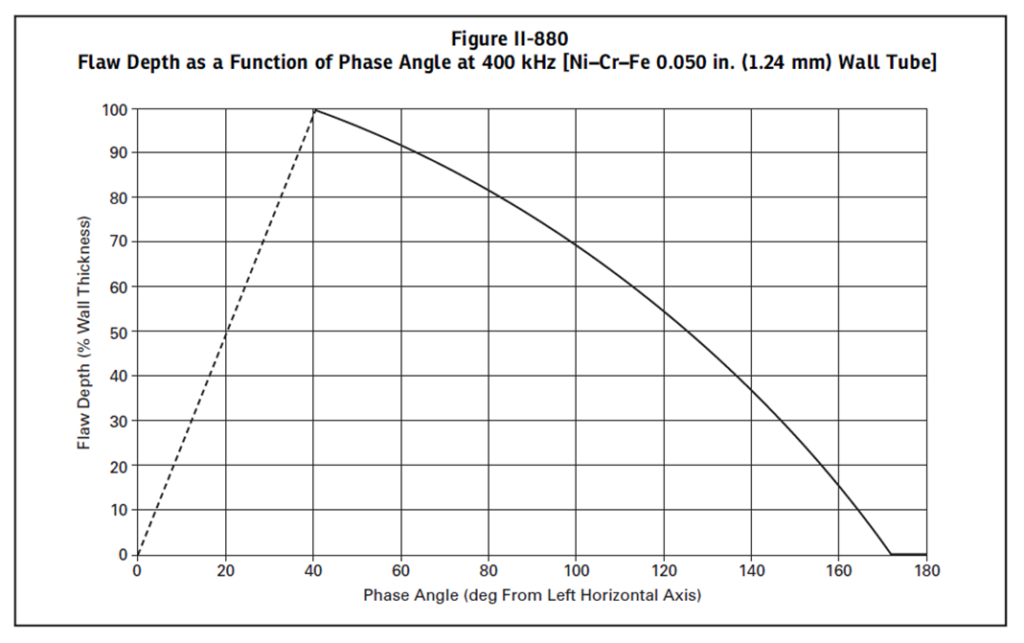
For indication types that must be reported in terms of depth, a means of correlating the indication depth with the signal amplitude or phase shall be established. The means of correlating the signal amplitude or phase with the indication depth shall be based on the basic calibration standard or other representative standards that have been qualified. This shall be accomplished by using curves, tables, or software. Figure II-880 illustrates the relationship of phase angle versus flaw depth for a nonferromagnetic thin-walled tube examined at a frequency selected to optimize flaw resolution.
11.2 FREQUENCIES USED FOR DATA EVALUATION
All indications shall be evaluated. Indication types, which must be reported, shall be characterized using the frequencies or frequency mixes that were qualified.
12.0 DOCUMENTATION :
12.1 REPORTING
12.1.1 Criteria. Indications reported in accordance with the requirements of this Appendix shall be described in terms of the following information, as a minimum:
- location along the length of the tube and with respect to the support members
- depth of the indication through the tube wall, when required by this procedure
- signal amplitude
- frequency or frequency mix from which the indication was evaluated
12.1.2 Depth. The maximum evaluated depth of flaws shall be reported in terms of percentage of tube wall loss. When the loss of tube wall is determined by the analyst to be less than 20%, the exact percentage of tube wall loss need not be recorded, i.e., the indication may be reported as being less than 20%.
12.1.3 Nonquantifiable Indications. A nonquantifiable indication is a reportable indication that cannot be characterized. The indication shall be considered a flaw until otherwise resolved.
12.1.4 Location of Support Members. The location of support members used as reference points for the eddy current examination shall be verified by fabrication drawings or the use of a measurement technique.
13.0 RECORDS :
13.1 Record Identification. The recording media shall contain the following information within each unit of data storage:
- (a) Owner
- (b) plant site and unit
- (c) heat exchanger identification
- (d) data storage unit number
- (e) date of examination
- (f) serial number of the calibration standard
- (g) operator’s identification and certification level
- (h) examination frequency or frequencies
- (i) mode of operation including instrument sample rate, drive voltage, and gain settings
- (j) lengths of probe and probe extension cables
- (k) size and type of probes
- (l) probe manufacturer’s name and manufacturer’s part number or probe description and serial number
- (m) eddy current instrument serial number
- (n) probe scan direction during data acquisition
- (o) application side — inlet or outlet
- (p) slip ring serial number, as applicable
- (q) procedure identification and revision
13.2 Tube Identification.
(a) Each tube examined shall be identified on the applicable unit of data storage and
(b)The method of recording the tube identification shall correlate tube identification with corresponding recorded tube data.
13.3 Reporting.
- The Owner or his agent shall prepare a report of the examinations performed. Procedures and equipment used shall be identified sufficiently to permit comparison of the examination results with new examination results run at a later date. This shall include initial calibration data for each eddy current examination system or part thereof.
- The report shall include a record indicating the tubes examined (this may be marked on a tubesheet sketch or drawing), any scanning limitations, the location and depth of each reported flaw, and the identification and certification level of the operators and data evaluators that conducted each examination or part thereof.
- Tubes that are to be repaired or removed from service, based on eddy current examination data, shall be identified.
References :
- ASME BPVC Article 8
- Feature Image Credits : chemtexcorp
