Acoustic Emission Testing is a qualitative NDT method. It differs from most other nondestructive testing (NDT) methods in two key respects. First, the signal has its origin in the material itself, not in an external source. Second, acoustic emission detects movement, while most other methods detect existing geometrical discontinuities. We will have a brief introduction about AE testing in this article.
As per ASME BPVC Article – 1
acoustic emission (AE) is the class of phenomena whereby transient stress/displacement waves are generated by the rapid release of energy from localized sources within a material, or the transient waves so generated.
Origin of Acoustic Emission
There are no precise dates recorded as to when NDT began as a recognized technology, human beings have performed nondestructive tests from their beginning. Centuries before the expression NDT was first used, people “looked” at objects to determine size, shape, and even the presence of visual surface imperfections and “listened” to the metal being shaped by a blacksmith or the tone of a bell after it was cast. Similarly, the origin of AE is hard to pinpoint. As early as 6,500 BC, potters were known to listen for audible sounds during the cooling of their ceramics, signifying structural failure. In metalworking, the term “tin cry” (audible emissions produced by the mechanical twinning of pure tin during plastic deformation) was coined around 3,700 BC by tin smelters in Asia Minor. The first documented observations of AE appear to have been made in the 8th century by Arabian alchemist Jabir ibn Hayyan. In a book, Hayyan wrote that Jupiter (tin) gives off a ‘harsh sound’ when worked, while Mars (iron) ‘sounds much’ during forging.
To learn more about the History of NDT read our blog: HISTORY OF NON-DESTRUCTIVE TESTING(NDT)
Basic Principle
ACOUSTIC EMISSIONS are stress waves produced by sudden movement in stressed materials. It is a radiation of acoustic (elastic) waves in solids that occurs when a material undergoes irreversible changes in its internal structure.
The figure below Figure 1. Shows a typical setup of Acoustic emission testing The process of generation and detection of Acoustic emissions. The test object is loaded under a controlled load. A sensor to sense any emitted AE is kept in contact with the test object. The load/stress applied on the test object causes the defects such as crack growth and plastic deformation. This sudden movement at the source produces a stress wave, which radiates out into the structure and excites a sensitive piezoelectric transducer.
As the stress in the material is raised, many of these emissions are generated. The signals from one or more sensors are amplified and measured to produce data for display and Interpretation.
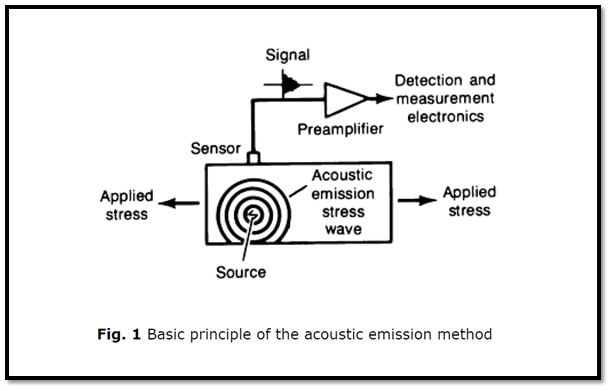
AE inspection allows the whole volume of the structure to be inspected non- intrusively in a single loading operation. It is not necessary to scan the structure looking for local defects; it is only necessary to connect a suitable number of fixed sensors; which are typically placed 1 to 6 m (4 to 20 ft) apart. This leads to major savings in testing large structures, for which other methods require removal of insulation, decontamination for entry to vessel interiors, or scanning of very large areas.
Typically, the AE inspection is used to identify areas with structural problems, and other NDT methods are then used to identify more precisely the nature of the emitting defects. Depending on the case, acceptance or rejection can be based on AE inspection alone, other methods alone, or both together.
Components of an AE system
Test Object:
Acoustic emission is a natural phenomenon occurring in the widest range of materials, structures, and processes. The source of the acoustic emission energy is the elastic stress field in the material. Without stress, there is no emission. Therefore, an acoustic emission (AE) inspection is usually carried out during a controlled loading of the structure. This can be a proof load before service, a controlled variation of load while the structure is in service, a fatigue test, a creep test, or a complex loading program. Often, a structure is going to be loaded anyway, and AE inspection is used because it gives valuable additional information about the performance of the structure under load.
Acoustic Emission Sensors and Preamplifiers*
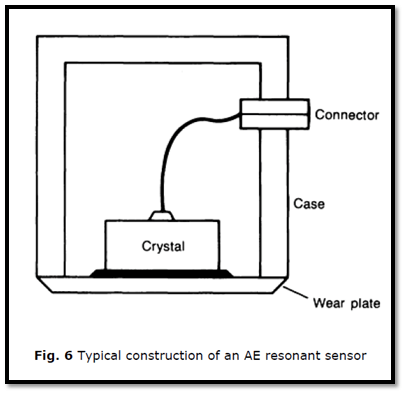
The key element in an AE resonant sensor is a piezoelectric crystal (transducer) that converts movement into an electrical voltage. The crystal is housed in a suitable enclosure with a wear plate and a connector, as shown in Fig. 6. The sensor is excited by the stress waves impinging on its face, and it delivers an electrical signal to a nearby preamplifier and then to the main signal-processing equipment. The preamplifier can be miniaturized and housed inside the sensor enclosure, facilitating setup and reducing vulnerability to electromagnetic noise.
Couplants
On a microscopic scale, the surfaces of the sensor and the material are quite rough; they actually touch in only a few spots when they are in contact. Stress is force per unit area and the actual area transmitting a force is very small. If the microscopic gaps are filled with a fluid, the pressure will be uniformly transferred between the surfaces. a high viscosity liquid or a solid will help transmit the parallel strain between surfaces.
Although the terms bond and couplant have been used interchangeably in many AE reports , their meanings significantly differ. Strictly, a couplant is any material which aids the transmittal of acoustic waves between two surfaces, while a bond is a couplant which physically holds the sensor to the surface. For example, water is a couplant, but cured epoxy resin is a bond.
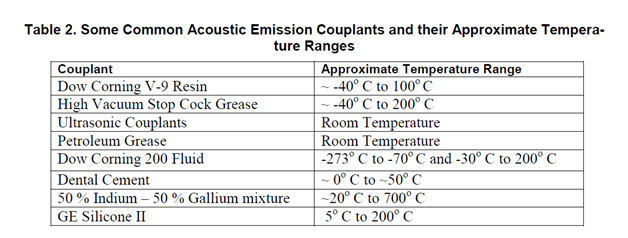
In Table 2, a few commonly used couplants are listed along with the temperature range in which they can be used
Noise
Acoustic emission equipment is highly sensitive to any kind of movement in its operating frequency range (typically 20 to 1200 kHz). The equipment can detect not only crack growth and material deformation but also such processes as solidification, friction, and impact, flow, and phase transformations. Therefore,
When these same processes of impact, friction, flow, and so on, occur during a typical AE inspection for cracks or corrosion, they constitute a source of unwanted noise. Many techniques have been developed for eliminating or discriminating against these and other noise sources. Noise has always been a potential barrier to AE applicability. This barrier is constantly being explored and pushed outward, bringing previously impractical projects into the realm of feasibility.
Activity of AE Sources in Structural Loading
AE signals generated under different loading patterns can provide valuable information concerning the structural integrity of a material.
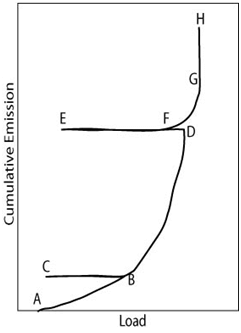
Load levels that have been previously exerted on a material do not produce AE activity. In other words, discontinuities created in a material do not expand or move until that former stress is exceeded. This phenomenon, known as the Kaiser Effect, can be seen in the load versus AE plot to the right.
As the object is loaded, acoustic emission events accumulate (segment AB). When the load is removed and reapplied (segment BCB), AE events do not occur again until the load at point B is exceeded. As the load exerted on the material is increased again (BD), AE’s are generated and stop when the load is removed. However, at point F, the applied load is high enough to cause significant emissions even though the previous maximum load (D) was not reached. This phenomenon is known as the Felicity Effect.
Procedures for AE structural testing have been published by The American Society of Mechanical Engineers (ASME), the American Society for Testing and Materials (ASTM), and other organizations. Successful structural testing comes about when the capabilities and benefits of AE inspection are correctly identified in the context of overall inspection needs and when the correct techniques and instruments are used in developing and performing the test procedure .
Applications
The three major applications of AE techniques are:
1) source location – determine the locations where an event source occurred;
2) material mechanical performance – evaluate and characterize materials/structures; and
3) health monitoring – monitor the safe operation of a structure, for example, bridges, pressure containers, and pipe lines, etc.
Acoustic emission tests are performed on both new and in-service equipment. Typical uses include the detection of cracks, corrosion, weld defects, and material embrittlement.
AE techniques are also valuable for:
- In-process weld monitoring
- Structural testing on pressure vessels, storage tanks, pipelines and piping, aircraft and space vehicles, electric utility plants, bridges, railroad tank cars, bucket trucks, etc
- Detecting tool touch and tool wear during automatic machining
- Detecting wear and loss of lubrication in rotating equipment, and tribological studies
- Detecting loose parts and loose particles
- Detecting and monitoring leaks, cavitation, and flow
- Monitoring chemical reactions, including corrosion processes, liquid-solid transformations, and phase transformations
References
- ASME BPVC Sec- V
- nde-ed.org
- ASM Metals Handbook Volume 17, Non-Destructive Evaluation and Quality Control
- SANDIA REPORT – Acoustic Emission Non-Destructive Testing of Structures using Source Location Techniques
This is a great technology for human requirement.
In medical, Mechanical, Electric, Electronic applications perform wonderful detective jobs and helps to monitor the health of the systems including human beings, animals and pests.
I love to join this forum as Ultra sound instruments operating for Mechanical Electrical problems for Industries.
regards
Tatta Seshu R