Liquid penetrant testing is a versatile nondestructive test method used for the detection of OPEN TO SURFACE DISCONTINUITIES in a wide variety of solid, non-porous materials. This method is also known as dye penetration testing. Article -6 of ASME BPVC Sec-V is the article for Liquid penetrant Testing
Disclaimer
- This article is written with reference to ASME BPVC Sec-V 2019, Article 6, however, this article only covers in general conditions while carrying out the penetrant test.
- There are certain other situations and exceptions addressed in the code while carrying out the test.
- This blog is only a more simplified version of the content given in the code for a better understanding of the code guidelines.
Scope
This document provides details to be considered while carrying out Liquid Penetrant testing with Water washable and Solvent Removable Penetrants.
Steps involved in testing:
STEP 1: PRECLEANING
STEP 2: APPLICATION OF PENETRANT
STEP 3: APPLICATION OF DEVELOPER
STEP 4: EVALUATION AND INTERPRETATION
STEP 5: POST CLEANING
To learn more about above mentioned steps read our blog :
INTRODUCTION TO LIQUID PENETRANT TESTING(PT)
REQUIREMENTS FOR SURFACE PREPARATION
- the surface of the part should be in the as-welded, as-rolled, as-cast, or as-forged condition.
- Precleaning should be carried out so that the surface to be examined and all adjacent areas within at least 1 in. (25 mm) becomes dry and free of all dirt, grease, lint, scale, welding flux, weld spatter, paint, oil, and other extraneous matter that could obscure surface openings or otherwise interfere with the examination.
- Typical cleaning agents which can be used are detergents, organic solvents, descaling solutions, and paint removers. Degreasing and ultrasonic cleaning methods can also be used.
Note: Cleaning operations like power wire brushing, grit blasting, shot peening and other metal smearing operations must be avoided.
DRYING AFTER SURFACE PREPARATION
- Prior to the application of the penetrant, it should be ensured that the cleaning solution has evaporated.
- drying of the surfaces to be examined should be accomplished by normal evaporation or with forced hot or cold air after Precleaning.
TEMPERATURE OF THE TEST SURFACE
- As a standard technique, the temperature of the penetrant and the surface of the part to be processed should not be below 40°F (5°C) nor above 125°F (52°C) throughout the examination period.
- Local heating or cooling is permitted provided the part temperature remains in the Range of 40°F to 125°F (5°C to 52°C) during the examination.
CALIBRATION OF EQUIPMENT
Equipment like Light meters, both visible and fluorescent (black) light meters, should be calibrated at least once a year or whenever the meter has been repaired. If meters have not been in use for one year or more, calibration should be done before being used.
MATERIALS used should be in within expiry due date provided by the manufacturer
APPLICATION OF PENETRANT
The penetrant can be applied by any suitable means, such as
- dipping,
- brushing,
- spraying.
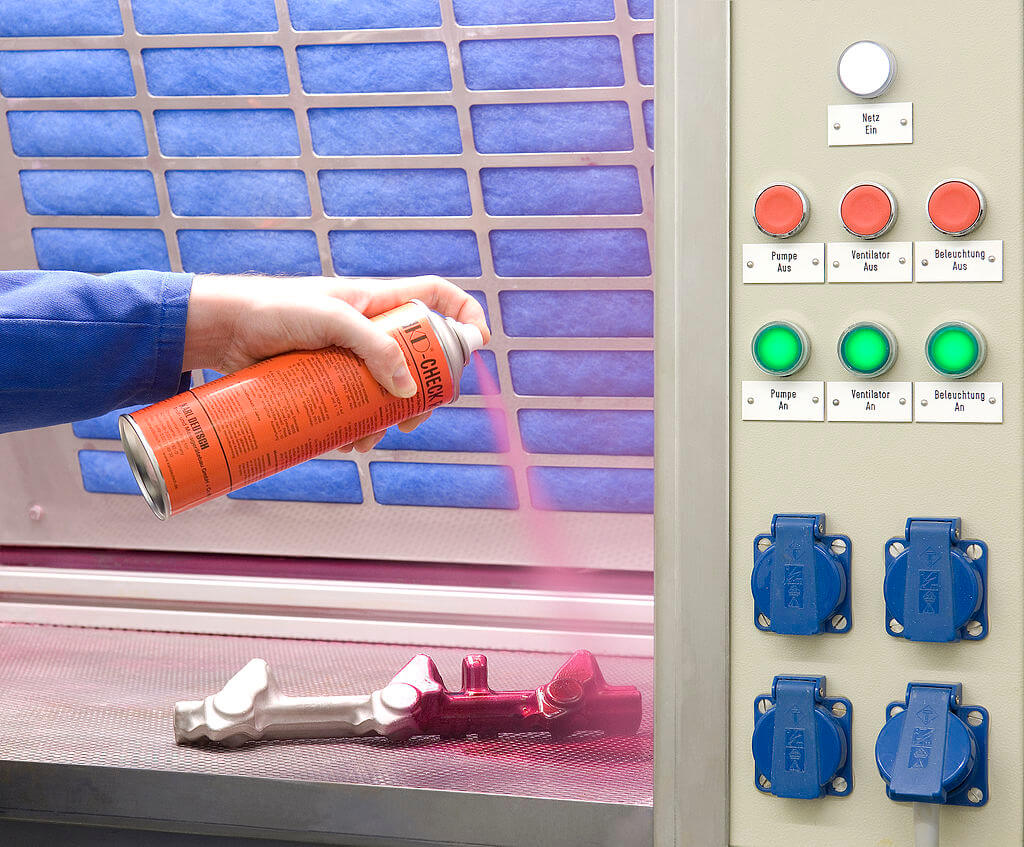
When the penetrant is applied by spraying using compressed air type apparatus. Filters should be placed on the upstream side near the air inlet to prevent contamination of the penetrant by oil, water, dirt, or sediment that can have collected in the lines.
Quick tip: commercially available aerosols are manufactured as per code requirements that can be used for easy and quick Penetrant Testing.
Magnaflux is a leading manufacturer of such Aerosol penetrant testing.
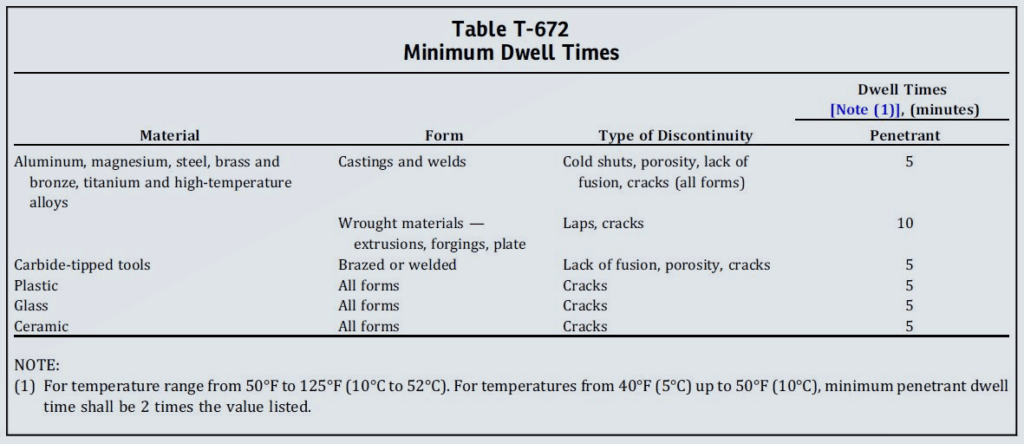
PENETRANT (DWELL) TIME
- The minimum penetration time should be as required in Table T-672 of ASME BPVC SEC-V, Article 6
- The maximum dwell time should not exceed 2 hr or as qualified by demonstration for specific applications.
- Regardless of the length of the dwell time, the penetrant should not be allowed to dry. If for any reason the penetrant does dry, the examination procedure should be repeated, beginning with a cleaning of the examination surface.
REMOVAL OF EXCESS PENETRANT
After completion of Penetrant dwell time, any penetrant remaining on the surface should be removed with care such that the minimum penetrant gets removed from discontinuities.
For Water-Washable Penetrant
- Excess water-washable penetrants should be removed with a water spray.
- The water pressure should not exceed 50 psi (350 kPa),
- the water temperature should not exceed 110°F (43°C).
- As an alternative to (a), water-washable penetrants can be removed by wiping with a clean, dry, lint-free cloth or absorbent paper, repeating the operation until most traces of penetrant have been removed.
- The remaining traces should be removed by wiping the surface with a cloth or absorbent paper, lightly moistened with water.
Note :To minimize removal of penetrant from discontinuities, care should be taken to avoid the use of excess water.
For Solvent Removable Penetrant
- Excess solvent removable penetrants should be removed by wiping with a clean, dry, lint-free cloth or absorbent paper, repeating the operation until most traces of penetrant have been removed.
- The remaining traces should be removed by wiping the surface with a cloth or absorbent paper, lightly Moistened with solvent.
- Note: To minimize removal of penetrant from discontinuities, care should be taken to avoid the use of excess solvent.
WARNING: Flushing the surface with solvent, following the application of the penetrant and prior to developing, is prohibited.
DRYING AFTER REMOVAL OF EXCESS PENETRANT
- For the water-washable or post-emulsifying technique, the surfaces can be dried by blotting with clean materials or by using circulating air, provided the temperature of the surface is not raised above 125°F (52°C).
- For the solvent removable technique, the surfaces can be dried by normal evaporation, blotting, wiping, or forced air.
DEVELOPING
The developer should be applied as soon as possible after penetrant removal and test surface becomes dry.
Dry Developer Application.
Dry developer should be applied only to a dry surface by a soft brush, hand bulb, powder gun, or other means, provided the powder is dusted evenly over the entire surface being examined.
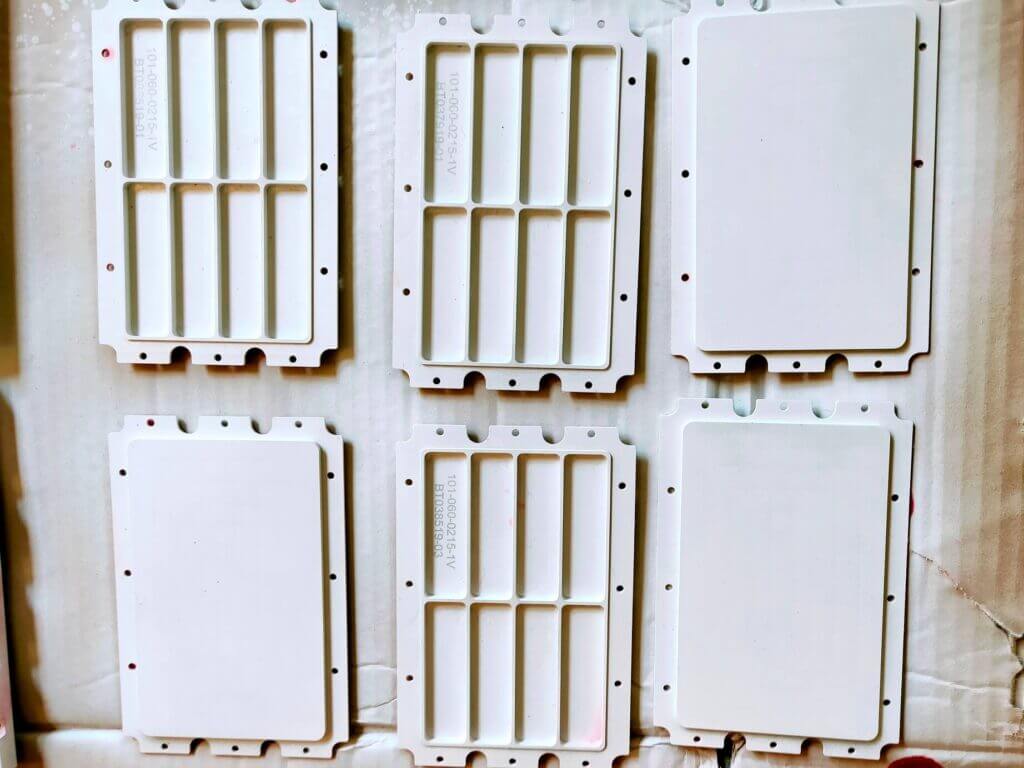
Wet Developer Application.
- The aqueous developer can be applied to either a wet or dry surface. It should be applied by dipping, brushing, spraying, or other means provided a thin coating is obtained over the entire surface being examined. Drying time can be decreased by using warm air, provided the surface temperature of the part is not raised above 125°F (52°C). Blotting is not permitted.
- Nonaqueous developers should be applied by spraying however, Nonaqueous developers can be applied by brushing when safety or restricted access doesn’t allow the application of developer by spraying.
A quick tip: For water washable penetrants, the developer should be applied to a dry surface. For solvent removable penetrants, the developer can be applied as soon as practical after excess penetrant removal. Drying should be by normal evaporation.
Important Note: Prior to applying suspension type wet developer to the surface, the developer must be thoroughly agitated to ensure adequate dispersion of suspended particles.
Developing Time. Developing time for final interpretation begins immediately after the application of a dry developer or as soon as a wet developer coating is dry.
EVALUATION & INTERPRETATION
Final Interpretation: Final interpretation should be made not less than 10 min nor more than 60 min after the wet developer coating is dry.
Quick Tip: If the surface to be examined is large enough to preclude complete examination within the prescribed or established time, the examination should be performed in increments.
Color Contrast (Visible)Penetrant
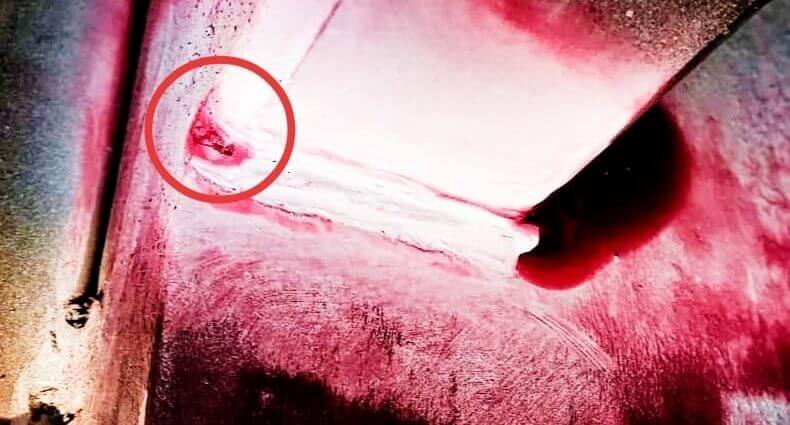
- With a color contrast penetrant, the developer forms a reasonably uniform white coating. Surface discontinuities are indicated by bleed-out of the penetrant which is normally a deep red color that stains the developer.
- Illumination (natural or supplemental white light) of the examination surface is required for the evaluation of indications. The minimum light intensity should be 100 fc (1076 lx).
- The light intensity, natural or supplemental white light source, should be measured with a white light meter prior to the evaluation of indications or a verified light source should be used. Verification of light sources is required to be demonstrated only one time, documented, and maintained on file.
footcandle (fc): the illumination on a surface, 1 ft sq. in area, on which is uniformly distributed flux of 1 lumen (lm). It equals 10.76 lm/m2.
Fluorescent Penetrant
With fluorescent penetrants, examination should be performed as follows:
- It should be performed in a darkened area with a maximum ambient white light level of 2 fc (21.5 lx) measured with a calibrated white light meter at the examination surface.
- Examiners should be in a darkened area for at least 5 min prior to performing examinations to enable their eyes to adapt to dark viewing. Glasses or lenses worn by examiners should not be photosensitive.
- The examination area should be illuminated with UV-A lights that operate in the range between 320 nm and 400 nm.
- UV-A lights should achieve a minimum of 1000 μW/cm2 on the surface of the part being examined throughout the examination.
- Reflectors and filters should be checked and, if necessary, cleaned prior to use. Cracked or broken reflectors, filters, glasses, or lenses should be replaced immediately.
- The UV-A light intensity should be measured with a UV-A light meter prior to use, whenever the light’s power source is interrupted or changed, and at the completion of the examination or series of examinations.
POST-EXAMINATION CLEANING
post-examination cleaning should be conducted as soon as practical after Evaluation and Documentation using a process that does not adversely affect the part.
EVALUATION
- All indications should be evaluated in terms of the acceptance Standards of the referencing Code Section ex. ASME BPVC Sec- VIII.
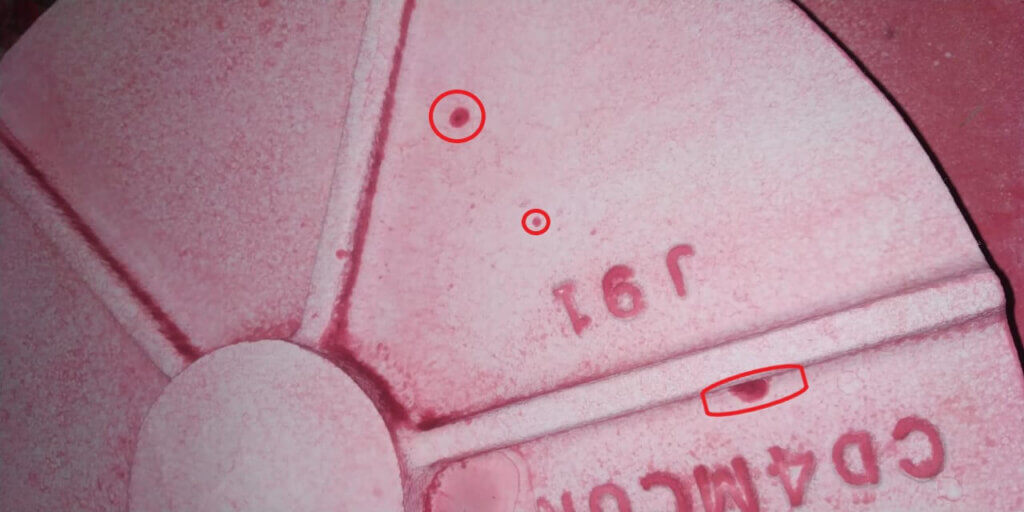
- Discontinuities at the surface will be indicated by bleed-out of penetrant; however, localized surface irregularities due to machining marks or other surface conditions can produce false indications.
- Broad areas of fluorescence or pigmentation which could mask indications of discontinuities are unacceptable, and such areas should be cleaned and reexamined.
DOCUMENTATION
RECORDING OF INDICATIONS
Rejectable(Defect) Indications: one or more flaws whose aggregate size, shape, orientation, location, or properties do not meet specified acceptance criteria and are rejectable.
Non Rejectable Indications/ Discontinuity: a lack of continuity or cohesion; an intentional or unintentional interruption in the physical structure or configuration of a material or component.
EXAMINATION RECORD
For each examination, the following information should be recorded:
- the requirements of Article 1, T-190(a) RECORDS/DOCUMENTATION;
- liquid penetrant type (visible or fluorescent);
- type (number or letter designation) of each penetrant,
- penetrant remover, emulsifier, and developer used;
- map or record of indications per RECORDING OF INDICATIONS;(Image of the part showing indications can be attached)
- material and thickness, and;
- lighting equipment.
Reference:
ASME BPVC Sec-V-2019 , Article 6
Wikipedia.org
Oh my goodness! an incredible article dude. Thanks Nevertheless I am experiencing concern with ur rss . Don抰 know why Unable to subscribe to it. Is there anybody getting similar rss problem? Anyone who knows kindly respond. Thnkx
Im grateful for the blog article.
your article was very helpful. keep it up