This Radiography Test Procedure is written with reference to ASME BPVC Sec-V, Article 2 & 22 for film base radiography of castings and welds with X-rays/Gamma Rays using industrial radiographic film.
This is part 2 of the Radiography procedure. Do read Part 1 of this procedure for complete knowledge.
RADIOGRAPHY TEST PROCEDURE PART – 1
RADIOGRAPHIC TECHNIQUES’s
- Single wall Technique
- Double-wall Technique
- Single wall viewing
- Double-wall viewing
A single-wall exposure technique shall be used for radiography whenever practical. When it is not practical to use a single-wall technique, a double-wall technique shall be used. An adequate number of exposures shall be made to demonstrate that the required coverage has been obtained.
Single-Wall Technique
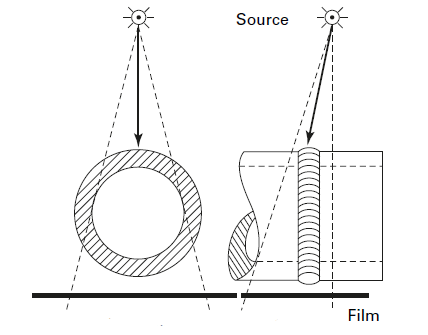
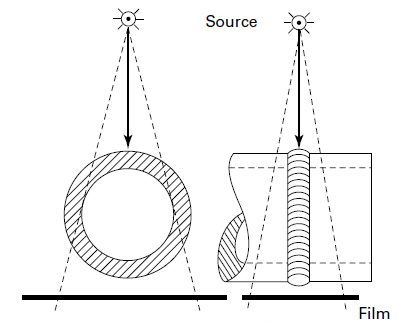
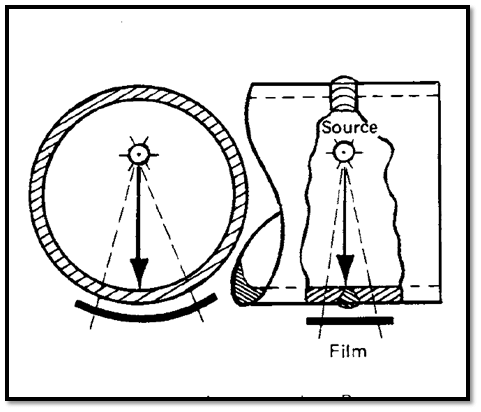
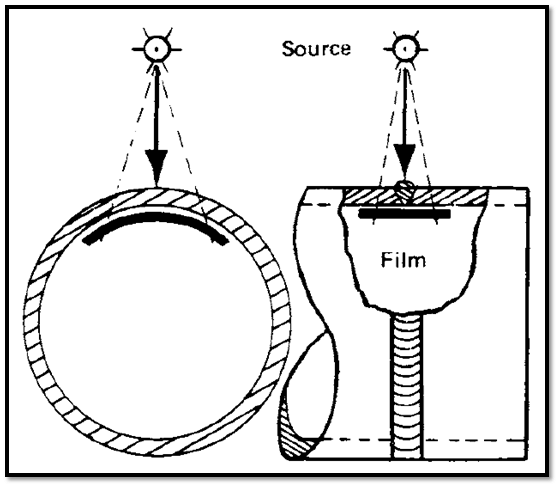
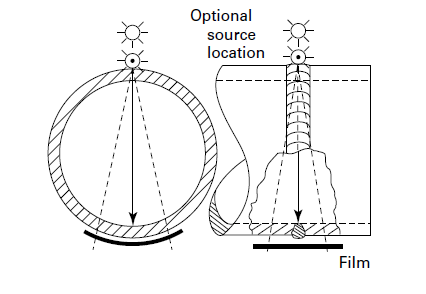
In the single-wall radiography technique, the radiation passes through only one wall of the weld (material), which is viewed for acceptance on the radiograph.

Setup 1 
Setup 2
Double-Wall Technique.
When it is not practical to use a single-wall technique, one of the following double-wall techniques shall be used.
Single-Wall Viewing
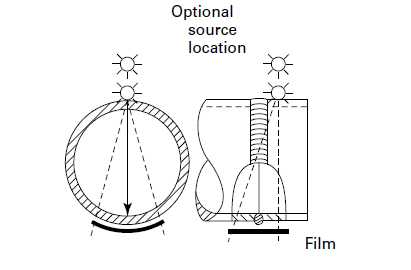
For materials and for welds in components, a radiography technique may be used in which the radiation passes through two walls and only the weld (material) on the film-side wall is viewed for acceptance on the radiograph. When complete coverage is required for circumferential welds (materials), a minimum of three exposures taken 120 deg to each other shall be made.

Setup 1 
Setup 2
Double-Wall Viewing
For materials and for welds in components 31/2 in. (89 mm) or less in nominal outside diameter, a radiography technique may be used in which the radiation passes through two walls and the weld (material) in both walls is viewed for acceptance on the same radiograph. For double-wall viewing, only a source-side IQI shall be used.
(1) For welds, the radiation beam may be offset from the plane of the weld at an angle sufficient to separate the images of the source-side and film-side portions of the weld so that there is no overlap of the areas to be interpreted. When complete coverage is required, a minimum of two exposures taken 90 deg to each other shall be made for each joint.
(2) As an alternative, the weld may be radiographed with the radiation beam positioned so that the images of both walls are superimposed. When complete coverage is required, a minimum of three exposures taken at either 60 deg or 120 deg to each other shall be made for each joint.
(3) Additional exposures shall be made if the required radiographic coverage cannot be obtained using the minimum number of exposures indicated in (1) or (2) above.
Note: DIRECTION OF RADIATION The direction of the central beam of radiation should be centered on the area of interest whenever practical.
GEOMETRIC UNSHARPNESS
geometric unsharpness: the penumbral shadow in a radiological image, which is dependent upon
- radiation source dimensions
- source-to-object distance
- object-to-detector distance
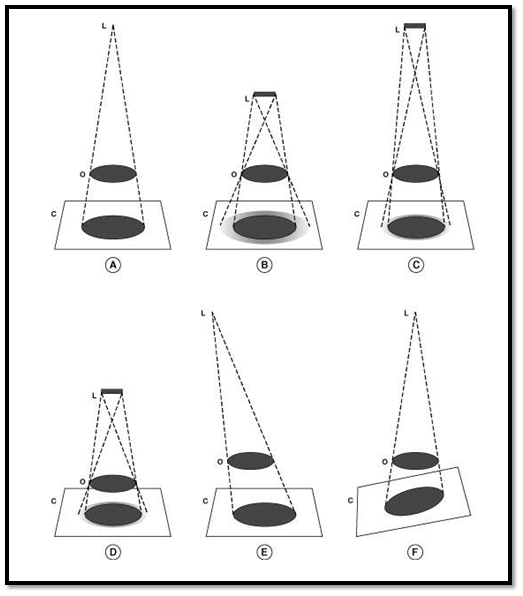
PC : Researchgate
In Above Figure: L = Source Size, O = Object , C = Imaging Media
Geometric Unsharpness Determination.
In Radiography Geometric unsharpness of the radiograph shall be determined in accordance with:
Ug = f *d/D
where
- D = distance from the source of radiation to weld or object being radiographed
- d = distance from the source side of weld or object being radiographed to the film
- F = source size: the maximum projected dimension of the radiating source (or effective focal spot) in
- the plane perpendicular to the distance D from the weld or object being radiographed
- Ug = geometric unsharpness
- D and d shall be determined at the approximate center of the area of interest.
Geometric Unsharpness Limitations.
As per ASME BPVC Sec-V, Article 2 Recommended maximum values for geometric unsharpness are as follows:

As per ASTM E 1030 STANDARD PRACTICE FOR RADIOGRAPHIC EXAMINATION OF METALLIC CASTINGS

LOCATION MARKERS
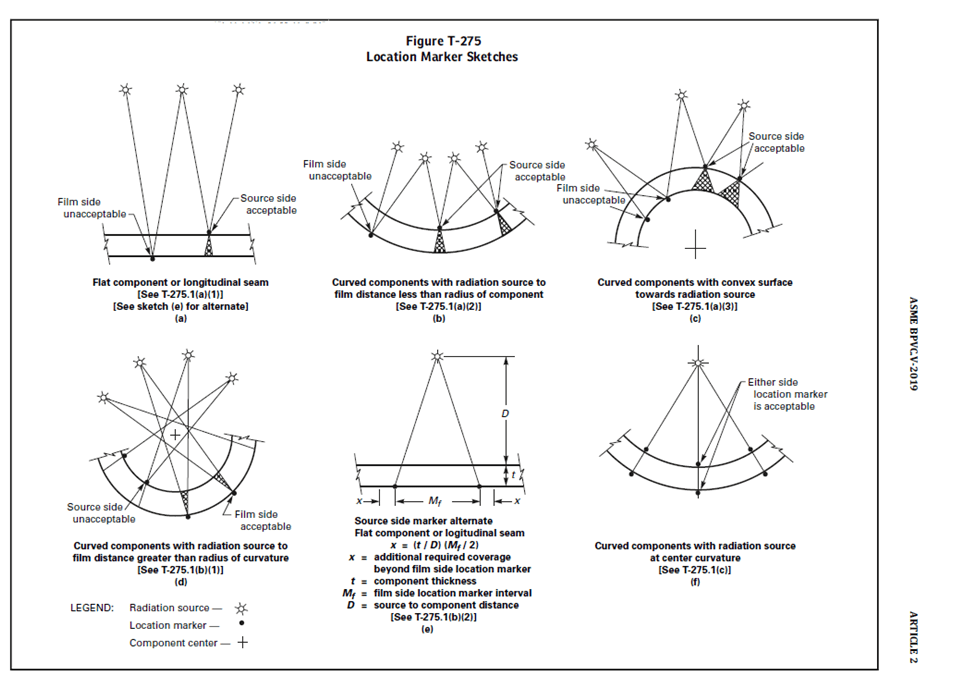
Location markers (see Figure T-275), which shall appear as radiographic images on the radiograph, shall be placed on the part, not on the exposure holder/cassette. Their locations shall be permanently marked on the surface of the part being radiographed when permitted, or on a map, in a manner permitting the area of interest on a radiograph to be accurately traceable to its location on the part, for the required retention period of the radiograph. Evidence shall also be provided on the radiograph that the required coverage of the region being examined has been obtained. Location markers shall be placed as follows.
Single-Wall Viewing.
(a) Source-Side Markers. Location markers shall be placed on the source side when radiographing the following:
- flat components or longitudinal joints in cylindrical or conical components;
- curved or spherical components whose concave side is toward the source and when the “source-to material” distance is less than the inside radius of the component;
- curved or spherical components whose convex side is toward the source.
(b) Film-Side Markers
- Location markers shall be placed on the film side when radiographing either curved or spherical components whose concave side is toward the source and when the “source-to-material” distance is greater than the inside radius.
- As an alternative to source-side placement in T-275.1(a)(1), location markers may be placed on the film side when the radiograph shows coverage beyond the location markers to the extent demonstrated by Figure T-275, sketch (e), and when this alternate is documented in accordance with T-291.
(c) Either Side Markers.
Location markers may be placed on either the source side or film side when radiographing either curved or spherical components whose concave side is toward the source and the “source-to-material” distance equals the inside radius of the component.
Double-Wall Viewing.
For double-wall viewing, at least one location marker shall be placed adjacent to the weld (or on the material in the area of interest) for each radiograph.
USE OF IQI’S TO MONITOR RADIOGRAPHY EXAMINATION
Placement of IQIs.
- Source-Side IQI(s). The IQI(s) shall be placed on the source side of the part being examined, except for the condition described in (b).
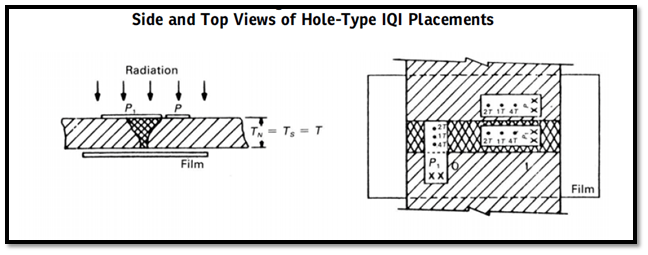
When, due to part or weld configuration or size, it is not practical to place the IQI(s) on the part or weld, the IQI(s) may be placed on a separate block. Separate blocks shall be made of the same or radiographically similar materials (as defined in SE-1025) and may be used to facilitate IQI positioning. There is no restriction on the separate block thickness, provided the IQI/area-of-interest density tolerance requirements are met.
- The IQI on the source side of the separate block shall be placed no closer to the film than the source side of the part being radiographed.
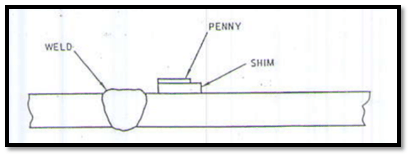
- The separate block shall be placed as close as possible to the part being radiographed.
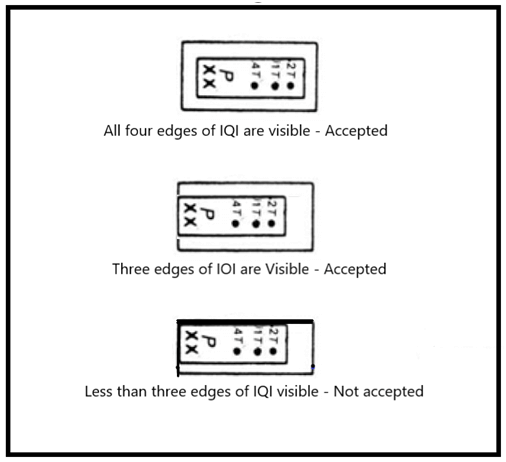
- When hole-type IQIs are used, the block dimensions shall exceed the IQI dimensions such that the outline of at least three sides of the IQI image shall be visible on the radiograph.
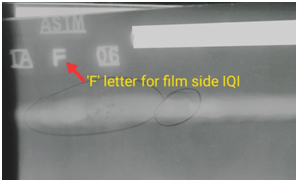
(b) Film-Side IQI(s). Where inaccessibility prevents hand placing the IQI(s) on the source side, the IQI(s) shall be placed on the film side in contact with the part being examined. A lead letter “F” shall be placed adjacent to or on the IQI(s), but shall not mask the essential hole where hole IQIs are used.
(c) IQI Placement for Welds—Hole IQIs. The IQI(s) may be placed adjacent to or on the weld. The identification number(s) and, when used, the lead letter “F,” shall not be in the area of interest, except when geometric configuration makes it impractical.
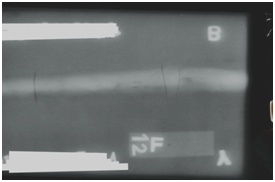
(d) IQI Placement for Welds — Wire IQIs. The IQI(s) shall be placed on the weld so that the lengths of the wires are transverse to the longitudinal axis of the weld. The IQI identification and, when used, the lead letter “F,” shall not be in the area of interest, except when geometric configuration makes it impractical.
(e) IQI Placement for Materials Other Than Welds. The IQI(s) with the IQI identification and, when used, the lead letter “F,” may be placed in the area of interest.
Number of IQIs in Radiography.
When one or more film holders are used for an exposure, at least one IQI image shall appear on each radiograph except as outlined in (b) below.
(a) Multiple IQIs. If the requirements are met by using more than one IQI, one shall be representative of the lightest area of interest and the other the darkest area of interest; the intervening densities on the radiograph shall be considered as having acceptable density.
(b) Special Cases
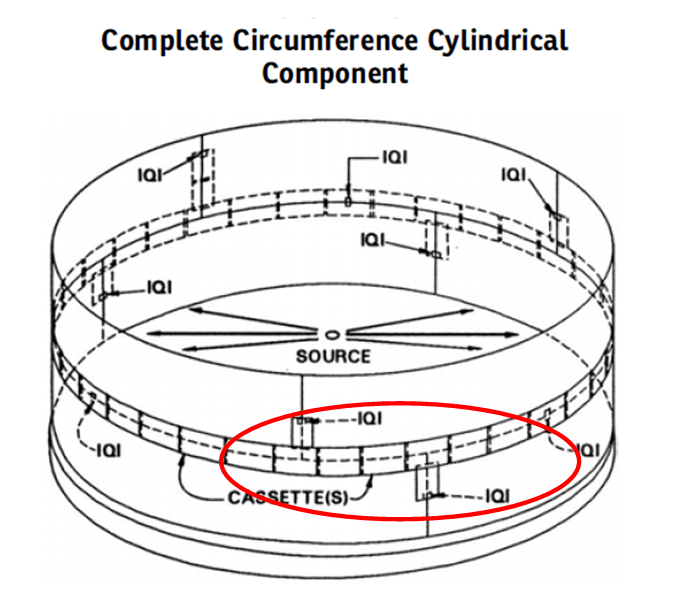
(1) For cylindrical components where the source is placed on the axis of the component for a single exposure, at least three IQIs, spaced approximately 120 deg apart, are required under the following conditions:
(-a) When the complete circumference is radiographed using one or more film holders, or;
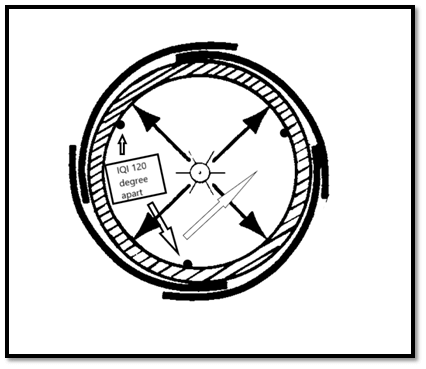
(-b) When a section or sections of the circumference, where the length between the ends of the outermost sections span 240 or more deg, is radiographed using one or more film holders. Additional film locations may be required to obtain necessary IQI spacing.
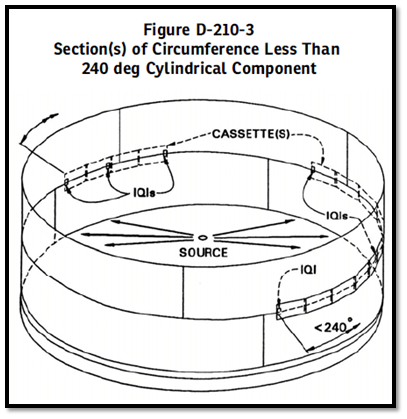
2) For cylindrical components where the source is placed on the axis of the component for a single exposure, at least three IQIs, with one placed at each end of the span of the Circumference radiographed and one in the approximate center of the span, are required under the following conditions:
(-a) When a section of the circumference, the length of which is greater than 120 deg and less than 240 deg, is radiographed using just one film holder, or;
(-b) When a section or sections of the circumference, where the length between the ends of the outermost sections span less than 240 deg, is radiographed using more than one film holder.
(3) In (1) and (2) above, where sections of longitudinal welds adjoining the circumferential weld are radiographed simultaneously with the circumferential weld, an additional IQI shall be placed on each longitudinal weld at the end of the section most remote from the junction with the circumferential weld being radiographed.
(4) For spherical components where the source is placed at the center of the component for a single exposure, at least three IQIs, spaced approximately 120 deg apart, are required under the following conditions:
(-a) When a complete circumference is radiographed using one or more film holders, or;
(-b) When a section or sections of a circumference, where the length between the ends of the outermost sections span 240 or more deg, is radiographed using one or more film holders. Additional film locations may be required to obtain necessary IQI spacing.
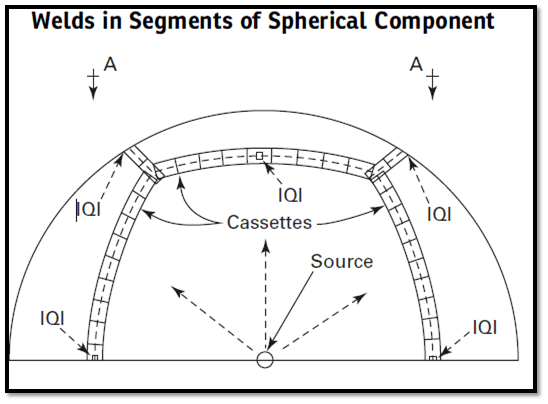
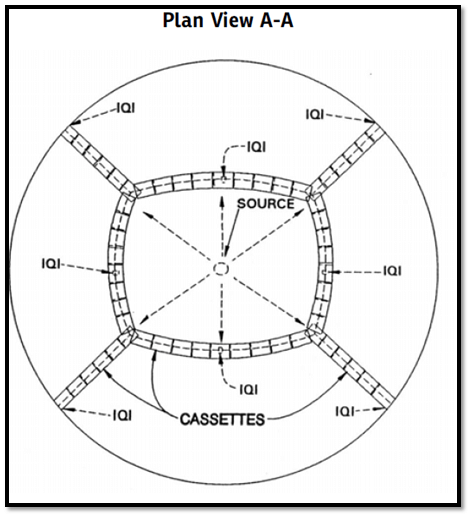
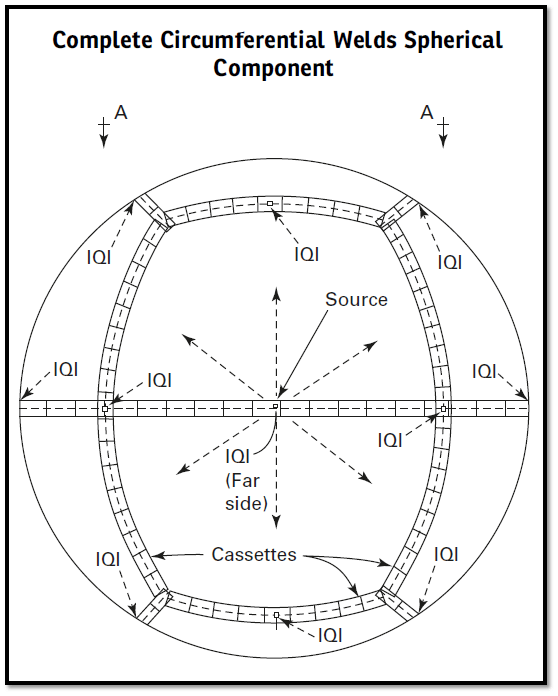
(5) For spherical components where the source is placed at the center of the component for a single exposure, at least three IQIs, with one placed at each end of the span of the circumference radiographed and one in the approximate center of the span, are required under the following conditions:
(-a) When a section of a circumference, the length of which is greater than 120 deg and less than 240 deg, is radiographed using just one film holder, or;
(-b) When a section or sections of a circumference, where the length between the ends of the outermost sections span less than 240 deg is radiographed using more than one film holder.
(6) In (4) and (5) above, where other welds are radiographed simultaneously with the circumferential weld, one additional IQI shall be placed on each other weld.
(7) For segments of a flat or curved (i.e., ellipsoidal, torispherical, toriconical, elliptical, etc.) component where the source is placed perpendicular to the center of a length of weld for a single exposure when using more than three film holders, at least three IQIs, one placed at
each end of the radiographed span and one in the approximate center of the span, are required.
(8) When an array of components in a circle is radiographed, at least one IQI shall show on each component image.
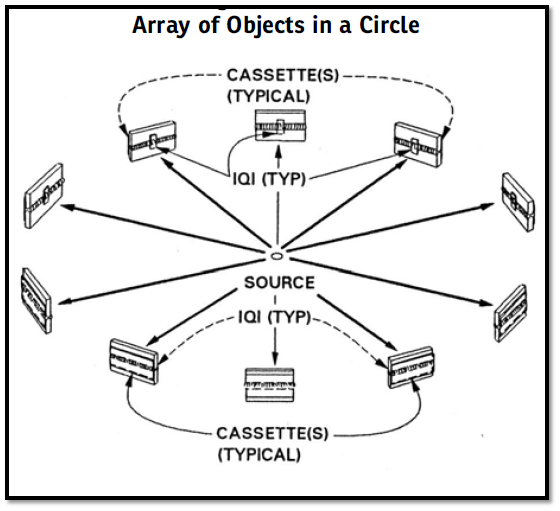
(9) In order to maintain the continuity of records involving subsequent exposures, all radiographs exhibiting IQIs that qualify the techniques permitted in accordance with (1) through (7) above shall be retained.
DOCUMENTATION
RADIOGRAPHIC TECHNIQUE DOCUMENTATION DETAILS
Prepare and document the radiographic technique details. As a minimum, the following information shall be provided.
(a) the requirements of Article 1, T-190(a)
(b) identification as required by T-224
(c) the dimensional map (if used) of marker placement in accordance with ASME BPVC Sec-V, T-275.3
(d) number of radiographs (exposures)
(e) X-ray voltage or isotope type used
(f) source size (F in T-274.1) in ASME BPVC Sec-V, Article 2.
(g) base material type and thickness, weld thickness, weld reinforcement thickness, as applicable
(h) source-to-object distance (D in T-274.1) ASME BPVC Sec-V, Article 2.
(i) distance from source side of object to film (d in T-274.1) ASME BPVC Sec-V, Article 2.
(j) film manufacturer and their assigned type/ designation
(k) number of film in each film holder/cassette
(l) single- or double-wall exposure
(m) single- or double-wall viewing
I agree with you
I agree with you
I really enjoy the blog.Much thanks again. Will read on…
Pretty nice post. I just stumbled upon your blog and wished to
say that I have really enjoyed browsing your blog posts.
In any case I’ll be subscribing to your rss feed and I hope you write again soon!