In this blog Basic Functional Controls of a UFD we will learn step by step about Basic controls one needs to operate a UFD.
In an Ultrasonic flaw detector (UFD), Controls are provided for the various circuits of the instruments, such as power supply, pulse, receiver, timer, and Display.
We have discussed all the circuits in our Blog, To learn more about Basics of Ultrasonic Flaw Detector Read Our Blog:
ULTRASONIC FLAW DETECTOR(UFD)
It generates and displays an ultrasonic waveform that is interpreted by a trained NDT operator, often with the aid of analysis software, to locate and categorize flaws in test pieces.
It typically includes an ultrasonic pulser/receiver, hardware and software for signal capture and analysis, a waveform display, and a data logging module. Most of the general use ultrasonic flaw detectors work on Pulse Echo Instrumentation Electronics having similar electronic circuitry performing similar basic functions.
These days ultrasonic flaw detectors are small, portable, microprocessor-based instruments suitable for both shop and field use.
Note: The nomenclature used can vary from one type of unit to another.
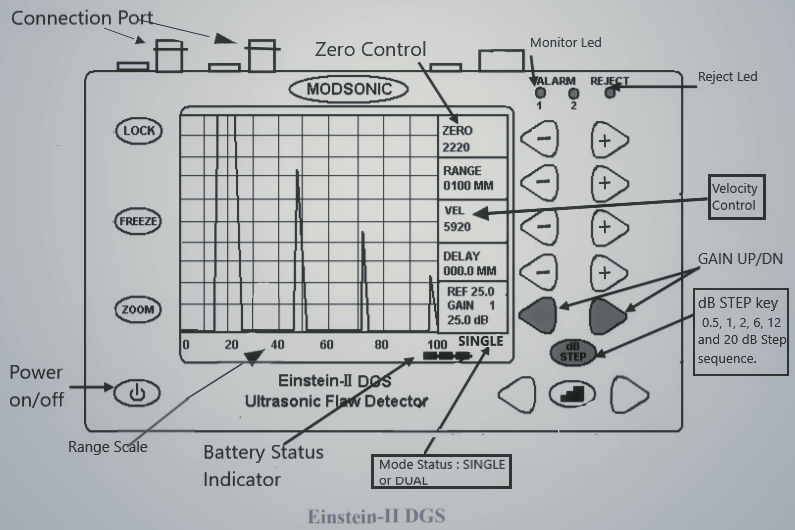
Ultrasonic Flaw Detector Modsonic Made
Keypad Instrumentation
UFD’s make use of menu sections that are adjusted from push-button keypads instead of knobs and toggle switches. The keypads and menus allow for the adjustment of all functions required for the standardization of the instrument in preparation for the actual test.
Power – On/Off control
It is usually a press button. It starts or stops the flow of power to the unit’s components, enabling or stopping the operation.
Almost all of the UFD Systems today use Lithium-Ion battery pack battery sources for power to make the instrument portable.
Battery Status Indicator is used to indicate the amount of power left in the instrument for example in the above figure When all the three cells are displayed empty, then the battery needs to be recharged.
Probe Mode Control
There are two modes for operation in a UFD that are:
- Single – used for normal and angle probes
- Dual – used for the TR probe and Dual crystal angle probe.

Angle Probe-Single Mode 
TR Probe – Dual Mode 
Angle Probe-Dual Mode 
Normal Probe – Single Mode
In single probe mode, the instrument sends and receive short bursts of electrical energy through a co-axial cable to a single transducer.
When switched to dual-probe mode, the instrument directs outgoing electrical bursts through the coaxial connector toward one transducer. The transmitter is tasked with sending ultrasonic waves into the test object.
Reflected incoming signals from the material are received by a separate transducer (Receiver) connected to the coaxial connector. This results in a through transmission or dual probe test, where the sending is isolated from the receiving transducer.
Range Control
The range control enables the technician to set a visible A-scan screen range. Generally, the range should be set so the echo from the thickest range material will be displayed on the screen.
If the range is not set as per required one might not see reflected echo’s for example if you want to scan a 100mm job. Since you have set your display range to 50mm you will not see the Back wall echo one the UFD display.
Successive presses of the range key toggle through present range values or the slewing keys can be held down to finely adjust the range setting.
Zero Offset control
The zero control compensates for sound transmission delays associated with the transducer, cable, and Couplant. This is a subtracted time data described below.
- Electric zero: point in time when the pulser fires the initial pulse to the transducer.
- Acoustic Zero: point in time when the sound wave enters the test object.
Velocity Control
The velocity control adjusts the instrument’s settings to match the speed of sound in the test object. Velocity variables are related to
- material density and elasticity,
- material temperature
- mode.
i.e. longitudinal wave versus shear wave, affect the velocity of sound within a given material.
This control allows the technician to adjust the ultrasonic instrument based on the chosen mode of transmission, as well as the true velocity of that mode within the test object.
Moreover, we know there are many types of waves out of which most commonly used are
- Longitudinal waves or Compression Waves: Propagation of waves in a straight direction.
- Transverse Waves or Shear Waves: particle vibrations are at a right angle to the direction of wave propagation. Propagates in solid only. These waves have a velocity approximate 50% of longitudinal waves.
Quick Tip: Normal probe and TR probe transmit longitudinal waves and angle probe transmits Transverse waves. Hence you will have to change the also as per the probe used.
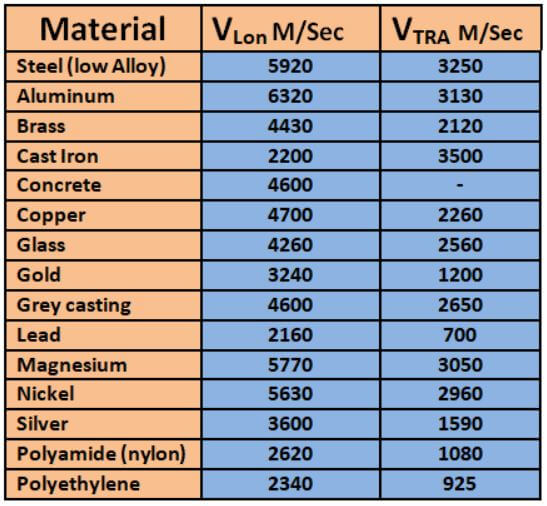
The below table provides velocity values for different materials for longitudinal and transverse waves.
Instrument Gain Controls
Instrument gain controls connect to the amplifier and adjust the amount of amplification that incoming signals from the transducer receive before the screen display is made.
The gain key controls the amplifier circuit. It does not have any influence over the outbound pulses, but the has everything to with signals returning from the test material.
The gain or system sensitivity, in modern ultrasonic instruments, may exceed 100dB and is adjustable in increments as small as 0.1dB. to use the gain control in the figure , the technician would simply press the decibel key(dB) and then the so-called slewing key(+/-) to increase decrease the amplification.
Coarse Range, Fine Range, and delay Controls
These controls serve as a means of causing the instrument screen to adjust the display along the horizontal axis. This display axis usually shows the time, distance or depth of ultrasonic travel in the test object.
The coarse range and fine range controls are sometimes called material calibration or material velocity controls, depending on the manufacturer of the instrument. These controls allow the technician to perform a basic part of the standardization/calibration of the instrument.
Coarse range and fine range controls allow for the precise screen placement of signals from known reference distances with standardization blocks. By the use of these controls, as well as the delay control, signals from known distances are placed in their correct position on the display screen.
This enables the screen to represent the appropriate distance that will allow for complete through dimension testing. By the use of standardization blocks made of a material like that to be tested, the instrument screen can be set to represent 2.5,13,25 cm or more of sound travel within test objects.
Display Status Control
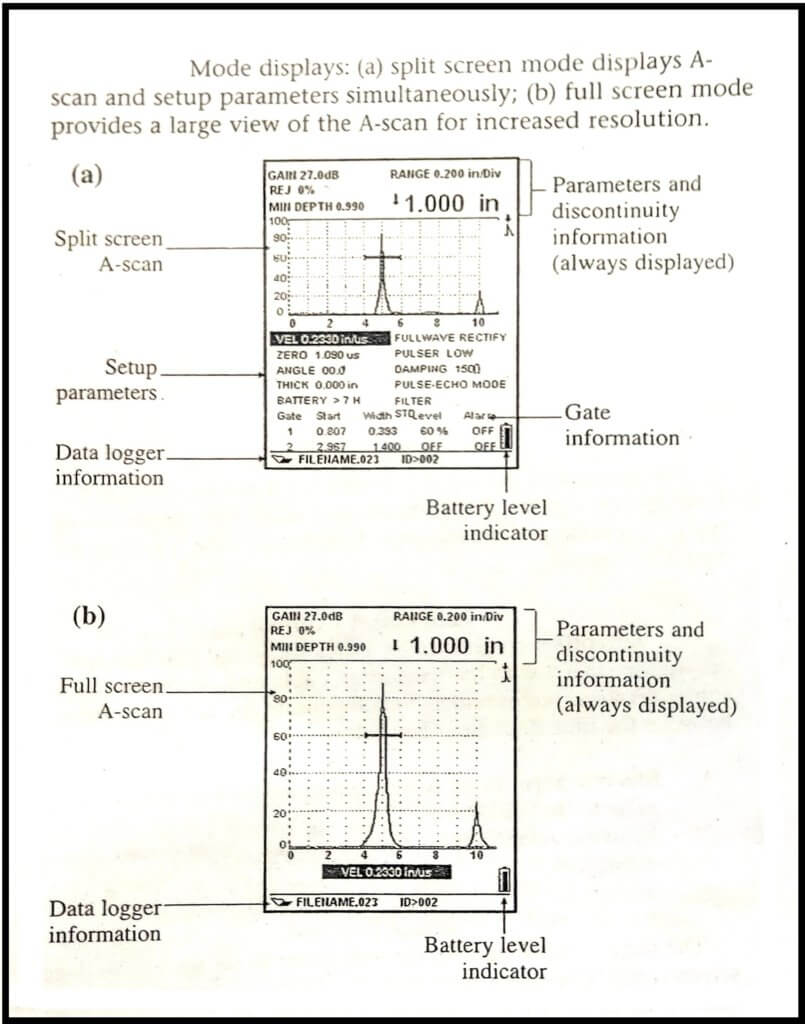
The display/status control allows the technician to switch between views of the display screen. For example, the screen would display the A-scan, the instrument settings or a combination of both shown on a so-called split-screen, the figure below shows what the technician sees after pressing the display/status button a second time.
Reject control
The purpose of the reject control in Ultrasonic flaw detector (UFD)is to eliminate unwanted, low-level A-scan signals. It is particularly useful in the inspection of typically coarse-grained castings. This control works on the amplifier circuit.
Gated alarm
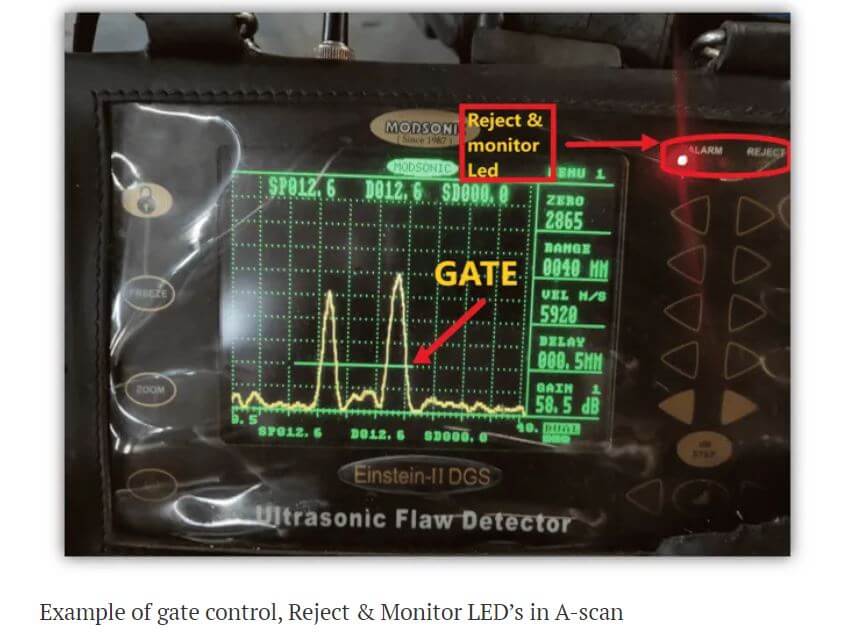
In Ultrasonic flaw detector’s (UFD) Gated alarm units enable automatic alarms when discontinuities are detected. This is accomplished by setting up specific, gated or zoned areas within the test object. Signals appearing within these gates may be monitored automatically to operate visual or audible alarms. These signals may be also be passed to recorders and external controls devices, Gated alarm units usually have three controls.
- Delay or Gate start: The gate start or delay control is used for adjustment of the location of the leading edge of the gate on the display screen.
- width or Gate length: the gate length or width control is used for adjustment of the length of the gate or the location of the gate trailing edge.
- sensitivity or Gate alarm level: The alarm level or gate-level control is used for adjustment of the gate vertical threshold to turn on signal lights or to activate an alarm relay.
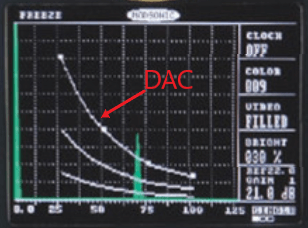
DAC Curve
In an Ultrasonic flaw detector (UFD) DAC curve stands for the DISTANCE AMPLITUDE CORRECTION curve. It is sometimes also called TIME CORRECTED GAIN OR TIME VARIED GAIN.
Distance amplitude correction (DAC) provides a means of establishing a graphic reference level sensitivity as a function of sweep distance on the A-scan display. The use of DAC allows signals reflected from similar discontinuities to be evaluated where signal attenuation as a function of depth has been correlated.
A distance amplitude correction curve is constructed from the peak amplitude responses from reflectors of the equal area at different distances in the same material block.
Calibration
The first step in any ultrasonic test is to calibrate the instrument system to ensure proper performance. A predictable and reproducible response to known reflectors of different sizes and depths within the calibration standard must be demonstrated before any actual application to the test object can begin.
We will learn more about the calibration of ultrasonic equipment in our upcoming Articles.
References
- PTP Ultrasonic Testing Classroom Training Book.
- Modsonic


Im grateful for the article.Really looking forward to read more. Awesome.
A round of applause for your blog post. Keep writing.