The ASME B31 Code for Pressure Piping consists of a number of individually published Sections, each an American National Standard, under the direction of ASME Committee B31, Code for Pressure Piping. ASME B31.3 contains requirements for piping typically found in petroleum refineries; chemical, pharmaceutical, textile, paper, semiconductor, and cryogenic plants; and related processing plants and terminals. It covers materials and components, design, fabrication, assembly, erection, examination, inspection, and testing of piping. Intended for manufacturers, users, constructors, designers, and others concerned with the design, fabrication, assembly, erection, examination, inspection, and testing of piping, plus all potential governing entities. Here in this article, we will learn about the NDE procedures for welds in B31.3.
The Code ASME B31.3 applies to piping for all fluids including:
(1) raw, intermediate, and finished chemicals;
(2) petroleum products;
(3) gas, steam, air, and water;
(4) fluidized solids;
(5) refrigerants; and
(6) cryogenic fluids.

Requirements for Examination Personnel
Personnel Qualification and Certification
Personnel performing nondestructive examination to the requirements of this Code shall be qualified and certified for the method to be utilized following a procedure as described in BPV Code, Section V, Article 1, T-120(e), or (f).
BPV Code, Section V, Article 1, T-120(e)
For those documents that directly reference this Article for the qualification of NDE personnel, the qualification shall be in accordance with their employer’s written practice which must be in accordance with one of the following documents:
- SNT-TC-1A, Personnel Qualification and Certification in Nondestructive Testing; or
- ANSI/ASNT CP-189, ASNT Standard for Qualification and Certification of Nondestructive Testing Personnel
Read BEGINNERS GUIDE TO NON-DESTRUCTIVE TESTING (NDT) – UPDATED 2020 ESSENTIALS OF ANSI / ASNT CP-189-2016
BPV Code, Section V, Article 1, T-120 (f)
National or international central certification programs, such as the ASNT Central Certification Program (ACCP) or ISO 9712:2012-based programs, may be alternatively used to fulfill the training, experience, and examination requirements of the documents listed in (e) as specified in the employ’s written practice.
Definitions.
The following terms apply to any type of examination:
- 100% examination: a complete examination of all of a specified kind of item in a designated lot of piping.
- random examination: a complete examination of a percentage of a specified kind of item in a designated lot of piping
- spot examination: a specified partial examination of each of a specified kind of item in a designated lot of piping, e.g., of part of the length of all shop-fabricated welds in a lot of jacketed piping
- random spot examination: a specified partial examination of a percentage of a specified kind of item in a designated lot of piping.
Note: A designated lot is the quantity of piping to be considered in applying the requirements for examination in ASME B31.3. The quantity or extent of a designated lot should be established by agreement between the contracting parties before the start of work. More than one kind of designated lot may be established for different kinds of piping work.
Random or spot examination will not ensure a fabrication product of a prescribed quality level throughout. Items not examined in a lot of piping represented by such examination may contain defects that further examination could disclose. Specifically, if all radiographically disclosable weld defects must be eliminated from a lot of piping, 100% radiographic examination must be specified.
Visual Examination
Visual examination is the observation of the portion of components, joints, and other piping elements that are or can be exposed to view before, during, or after manufacture, fabrication, assembly, erection, examination, or testing. This examination includes verification of Code and engineering design requirements for materials, components, dimensions, joint preparation, alignment, welding, bonding, brazing, bolting, threading, or other joining method, supports, assembly, and erection. Visual examination shall be performed in accordance with the BPV Code, Section V, Article 9
Read : INTRODUCTION TO VISUAL TESTING
Magnetic Particle Examination
Magnetic particle examination of welds and of components other than castings shall be performed in accordance with BPV Code, Section V, Article 7. Magnetic particle indications are caused by the attraction of the test media to surface or near-surface discontinuities in the area under test. However, all such indications are not necessarily imperfections, since excessive roughness, magnetic permeability variations, etc., may produce non-relevant indications. Inadvertent accumulation of particles not related to magnetic attraction is classified as a false indication.
Indications shall be verified as being relevant, nonrelevant, or false. Additional surface preparation and/or other test methods may be used as needed to verify the relevance of an indication. An indication of an imperfection may be larger than the imperfection that causes it; however, the size of the indication is the basis for acceptance evaluation. Only indications that have any dimension greater than 1.5mm (1⁄16 in.) shall be considered relevant.
Liquid Penetrant Examination
Liquid penetrant examination of welds and of components other than castings shall be performed in accordance with BPV Code, Section V, Article 6. Liquid penetrant indications are caused by the bleed-out of a visible or fluorescent dye from a surface discontinuity in the area under test. However, all such indications are not necessarily imperfections, since excessive roughness, poor surface preparation, etc., may produce non-relevant indications. Inadvertent evidence of penetrant not related to actual bleed-out is classified as a false indication.
Indications shall be verified as being relevant, nonrelevant, or false. Additional surface preparation and/or other test methods may be used as needed to verify the relevance of an indication. An indication of an imperfection may be larger than the imperfection that causes it; however, the size of the indication is the basis for acceptance evaluation. Only indications that have any dimension greater than 1.5mm (1⁄16 in.) shall be considered relevant.
Radiographic Examination
Radiography of welds and of components other than castings shall be performed in accordance with BPV Code, Section V, Article 2.
Extent of Radiography
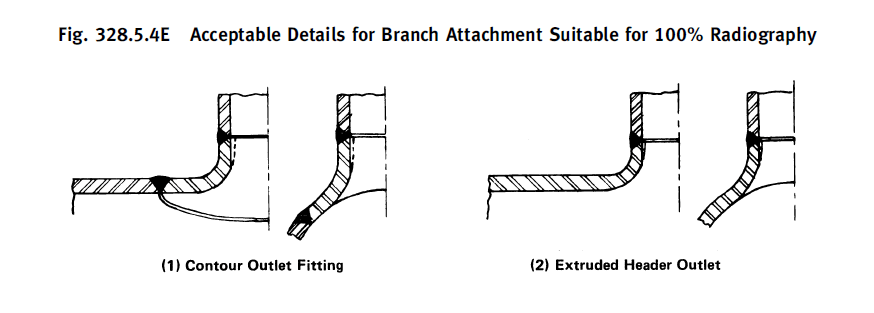
(a) 100% Radiography. This applies only to girth and miter groove welds and to fabricated branch connection welds comparable to ASME B31.3 Fig. 328.5.4E, unless otherwise specified in the engineering design.

(b) Random Radiography. This applies only to girth and miter groove welds.
(c) Spot Radiography. This requires a single exposure radiograph in accordance with ASME B31.3 para. 344.5.1 at a point within a specified extent of welding.
For girth, miter, and branch groove welds the minimum requirement is
- for sizes ≤DN 65 (NPS 21⁄2), a single elliptical exposure encompassing the entire weld circumference
- for sizes >DN 65, the lesser of 25% of the inside circumference or 152 mm (6 in.)
- For longitudinal welds the minimum requirement is 152 mm (6 in.) of weld length.
Ultrasonic Examination
Ultrasonic examination of welds shall be performed in accordance with BPV Code, Section V, Article 4, except that the alternative specified in (a) and (b) below is permitted for basic calibration blocks specified in BPV Code, Section V, Article 4 T-434.2.1 and T-434.3.
(a) When the basic calibration blocks have not received heat treatment in accordance with BPV Code, Section V, Article 4 T-434.1.5, transfer methods shall be used to correlate the responses from the basic calibration block and the component. Transfer is accomplished by noting the difference between responses received from the same reference reflector in the basic calibration block and in the component and correcting for the difference.
(b) The reference reflector may be a V-notch (which must subsequently be removed), an angle beam search unit acting as a reflector, or any other reflector that will aid in accomplishing the transfer.
(c) When the transfer method is chosen as an alternative, it shall be used, at the minimum
(1) for sizes ≤DN50 (NPS 2), once in each 10 welded joints examined
(2) for sizes >DN 50 and ≤DN 450 (NPS 18), once in each 1.5 m (5 ft) of welding examined
(3) for sizes >DN 450, once for each welded joint examined
(d) Each type of material and each size and wall thickness shall be considered separately in applying the transfer method. In addition, the transfer method shall be used at least twice on each type of weld joint.
(e) The reference level for monitoring discontinuities shall be modified to reflect the transfer correction when the transfer method is used.
References:
- ASME B31.3-2016 Process Piping ASME Code for Pressure Piping, B31
- ASME BPVC – Sec- V
- https://www.asme.org/
